
Tutorial using Scrappin Krazy Designs Kit Glitter! Glitter is a gorgeous kit and I had fun with it :)
You can find it here:
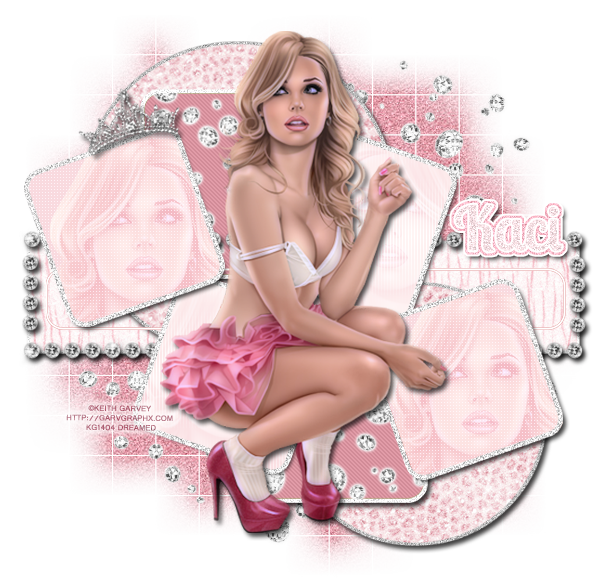
Tutorial
using Scrappin Krazy Designs PTU Kit Glitter!
Tools
Template used:
I used
template #141 from Millie’s PSP Madness.
You can
download here:
Tube used:
I used one
of my favorite tubes from Keith Garvey.
*You must
purchase the tube to obtain a license number*
You can
find her here:
(I just
noticed I used both Christmas template & tube, lol!)
Mask used:
WSL_Mask84
from Weescotslass Creations
You can
download here:
Elements
used:
Blingstrail
Blingstrail
Diamonds
Tiara
Papers
used:
P04
P05
P15
Filters
used:
Xero:
Porcelain
Xero: Soft
Vignette
Penta:
Jeans
Penta:
Color Dot
Now that we
are all set up, let’s get started!
Open a new
canvas. I used 650x650.
Open up the
template and delete the layers you do not want. (I removed 6, 15, 16, 17, and
Raster)
Link
together the layers you kept and move them to the new canvas.
Open up
papers 04 and 05.
Move
paper04 to layers 2 and 3, the black circles.
I added
glitter borders to both black circles.
Select
layer 1, the green rectangle.
Move
paper05 and resize to fit. I shrunk the paper down to get more of the pattern
so duplicate the paper after you get it the size you want.
Again, I
added a glitter border to this layer.
For layer 7
you can select pixels and fill with white.
Next, we
move to the two vertical boxes, they are layer 4 and 5.
Select the
pixels of layer 4 and fill with color.
I used color #d18b97. Repeat this step
for layer 5.
I used
filter Penta: Jeans on layers 4 and 5.
Amount – 17
Border
Width – 4
Add the diamonds element and put it in both layers 4 and 5. Size the diamonds as you wish and
then create clipping mask for both boxes.
I added a
light glow to the diamonds. Just change the glow to white and change the spread
to zero and size to 3.
Now we will
work with layers 8 – 15. The even numbers are the box and the odd numbers are
the borders. We will only work with the even numbers.
Select each
box on layers 8, 10, 12, and 14 and fill in with #f9dadf.
Now add the
close up of the tube and move it into the box. With the tube layer selected on
boxes 8 and 10 make it Screen. Boxes 12 and 14 will be Overlay.
I used
Penta: Color Dot in white and Xero: Soft Vignette.
Follow this
for Soft Vignette in boxes 8 and 10:
Gradient
Shape: Vertical
Effect
type: Background Colour
Pattern
type: Vertical Lines
Repeats: 10
Width: 0
Height: 0
Strength:
255
Open the tiara element and resize it smaller and put it over the top of the box on layer
12.
Add a drop
shadow.
Open the blingstrail element resize it to make a box around layer 1.
Add a drop
shadow.
Open the
mask, WSL_Mask84.
Open P15
and resize to 600x600
Open a new
canvas size 600x600
Move the
paper onto the canvas and then move the mask on top of the paper.
Remove the
background of the mask.
Move the
mask behind the template and resize to fit.
Add noise
to the mask. I used 8.
Make sure
that the edges are not cut off.
Now take
the diamonds element and put it above the mask layer.
Move and
resize so that you can see the diamonds behind the template.
I moved the
diamonds around and then duplicated it and flipped it for the opposite size.
Open your
tube of choice.
Move it on
top of the template and all elements.
Resize to fit and add a drop shadow.
Now we add
the filter, Xero: Porcelain. This can go for all the tube layers.
Softness:
50
Strength:
128
Brightness:
128
Red
Channel: 0
Green
Channel: 0
Blue Channel:
255
For the
name, I used Lobster Two font.
Make the
name a light pink color and add noise.
Add a white
stroke, size 2.
Select the
pixels of the name and expand by 3 or 4, whichever you like better.
Add a
darker pink color and add noise again.
Add a white
stroke, size 2 and add a drop shadow to the darker pink layer.
Add copyright information and tagger mark.
We’re done!
Now you can unclick the white background and save as a .psd and .png.
Thanks for
taking a look; I hope you enjoyed it as much as I did!

No comments:
Post a Comment