PTU Tutorial with Scrappin Krazy Designs' kit Country Chic with the artwork of Zlata M.
**This tutorial was written for those with a working knowledge of Photoshop.**
Tools
I used my mask, DCMask_19, which you can find here.
Filter
Xero Porcelain
Font
AltastGreeting
You can find it at Fonts101.
Tube
Girl&chickabiddy by Zlata_M
You can find it here.
*You must purchase this tube and obtain a license to use it.*
Elements
ele20
ele25
ele27
ele55
ele56
ele69
ele70
ele83
Papers
p05
p11
Open a new canvas, 650x650. That's my regular starting point, but in the end it will not be that big (or it can be if you like!).
Move ele20 onto the canvas and resize.
Move ele25 behind ele20. Resize so it sticks outside ele20 just a little.
Add a drop shadow to both.
Move ele83 onto the right side of ele20. Resize to your liking. I erased a few of the butterflies and rotated it so it curved with ele20. Add a drop shadow.
Move ele69 just to the right of the center of the bottom of the frame.
Move ele70 on the left side of ele69.
Resize and add a drop shadow to both.
Move ele27 behind the flowers (ele69 &70).
Make it small and move it to the left side of the flowers so it sticks out a little.
Flip it horizontally and move to the right side of the flowers, but more toward the center.
Add a drop shadow to both.
Move ele55 and ele56 behind ele69 and ele70.
I made ele55 smaller and rotated it just a little.
I made ele56 smaller, flipped it horizontally, and then flipped it vertically.
Add a drop shadow to both.
Add your tube on top of ele20, but behind the flowers, leaves, and ribbons. Erase any extras hanging outside the frame and add a drop shadow.
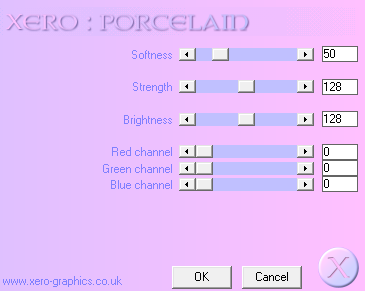
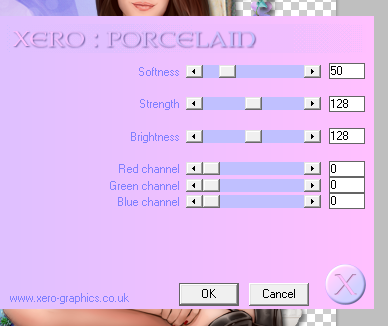
Add these settings for Xero Porcelain to the tube.
Move p05 behind ele25. Erase any extras hanging outside.
Open DCMask_19, p11, and a new canvas, size 600x600.
Resize p11 to 600x600.
Move p11 onto new blank canvas and then add the mask on top.
Remove the white background.
Move the mask behind everything and resize.
For font, I used #fb9d98 for the color.
Add a drop shadow and a white stroke, size 2.
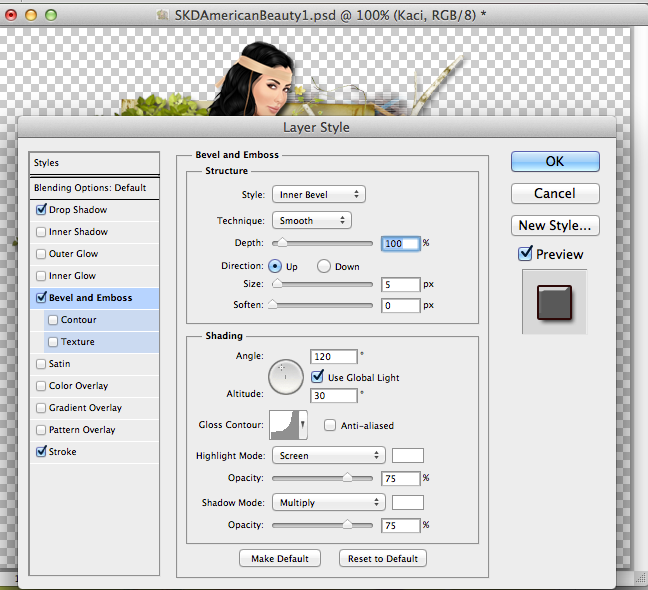
Add these settings for the bevel.
Add your copyright information and tagger mark.
Crop off any extra canvas.
Save as .psd and .png.
You can do so much with kit and it's gorgeous. I hope you enjoy! :)
Monday, March 25, 2013
Thursday, March 21, 2013
PTU "Spring In The Garden" Tutorial
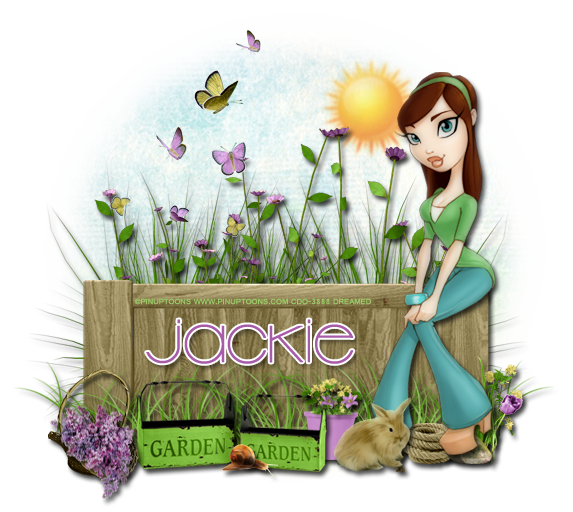
PTU Tutorial with Jackie's Jewels kit Spring In The Garden with the artwork of Pinup Toons.
**This tutorial was written for those with a working knowledge of Photoshop.**
Tools
I made a mask for this tutorial so please click on the image of the mask below, right click, and save!
Filter
Xero Porcelain
Font
New Garden
You can find it on dafont
Tube
60-1-PinupToons
You can find it here.
*You must purchase this tube and obtain a license to use it.*
Elements
Basket
Bunny2
Butterflies
Fence
Flowers1
Flower3
Flower5
Flower7
Flower8
FlowerPot1
Flowers
GardenPails
Grass
Grass2
LeafBundle
Rock&Grass
Rope
Snail
Sun
Paper
P1
Let's go!
Open a new canvas, size 650x650.
Move the fence on the canvas and resize it.
Add a drop shadow.
Move Flower1 behind the fence. Add a drop shadow.
Move Grass behind the flowers. Resize it and place two copies on the left and right side. Then add another copy of the grass, make a little smaller and fill in the empty space in the middle. Add a drop shadow to each grass layer.
Move Butterflies just above the fence layer. Resize and do not add a drop shadow unless you prefer it.
Move Grass2 on top of the fence and resize. I added a few copies and resized. Add a drop shadow to each layer.
Move Basket to the left side of the fence and resize. Add a drop shadow.
Move Flowers on top of Basket. I erased a little of the flowers so parts of the Basket stood out. Add a drop shadow.
To make the flower pot, open FlowerPot1, Flower3, 5, & 7, and leaf bundle. I kept everything the original size to make it easier to see what you're doing. Move the leaf bundle on top of the pot and erase parts hanging out to give the illusion it's inside the pot. Repeat the process with the flowers, flipping and resizing to give it that potted look. Add drop shadows to everything but the leaf bundle. Place it just right of the middle of the fence above the Grass.
Move GardenPails above the flower pot you just made but behind the basket of flowers. Resize and add a drop shadow.
Place your tube so we can place the other elements around her. Add a drop shadow.
Add these settings to the tube.
Move Bunny2 above the tube and add a drop shadow.
You can add the same settings for Xero Porcelain to the bunny, if you like.
Move Rope behind the tube but in front of the grass and add a drop shadow.
Move Rock&Grass behind the tube on the right side of the fence. Add a drop shadow.
Move Flower 5 and Flower 8 behind the Rock&Grass, resize, and add a drop shadow.
Move Snail in front of the GardenPails, resize, and add a drop shadow.
Open a new canvas, size 600x600.
Open P1 and resize the width to 600 and that will make the height 587. Move it onto the canvas.
Move DCMask_21 onto the canvas.
Crop out the extra mask and then remove the white background. Place it as the lowest layer. Resize so it is only sticking out of the top as your sky.
Move Sun on top of the mask, resize, and place behind the tube.
For the name add a drop shadow, and white stroke, size 2. I used #a65ca9 for the color of the name.
Add your tagger mark and copyright information.
Crop off any extras.
Save as .psd and .png.
This kit is so much fun! I know you will like it :)
Monday, March 18, 2013
PTU "Serenity Park" Tutorial
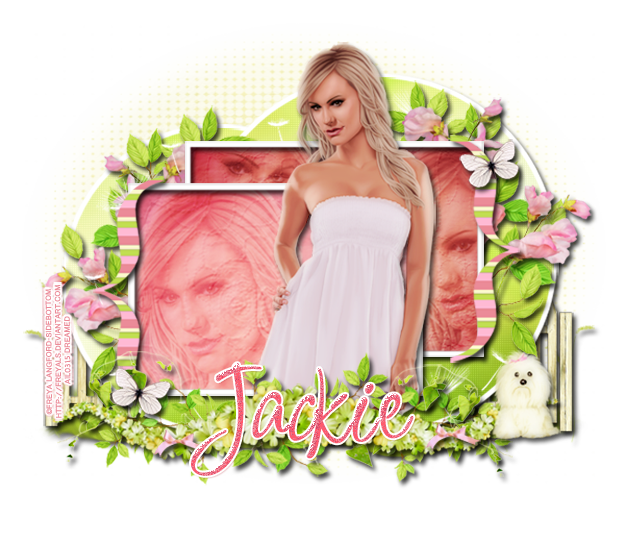
PTU Tutorial with Jackie's Jewels kit Serenity Park with the artwork of Freya Langford-Sidebottom.
**This tutorial was written for those with a working knowledge of Photoshop.**
Tools
Mask
I used my mask, DCMask_19, which you can find on my blog here.
Template
By Missy from Divine Intentionz
Font
Inspiration
Tube
Sookie by Freya Langford-Sidebottom
You can find it here.
*You must purchase this tube and obtain a license to use it.*
Filters
Xero Porcelain
Xero Radiance
Penta Color Dot
Elements
Bow3
Branch1
Butterfly1
Fence2
Flowers1
FlowerFloaties
Grass
Puppy1
RowofFlowers
Vines1
Weeds
Papers
Paper1
Paper2
Paper5
Paper8
Paper13
All set? Let's go :)
Open a new canvas, I made it 650x650.
Open the template and link all the layers you want together.
Move the linked layers onto the blank canvas. Unlink the layers.
Move Paper5 to the large circle and adjust the paper to your liking.
Create a clipping mask.
Move Paper5 to the second, smaller circle and adjust like before.
Create a clipping mask.
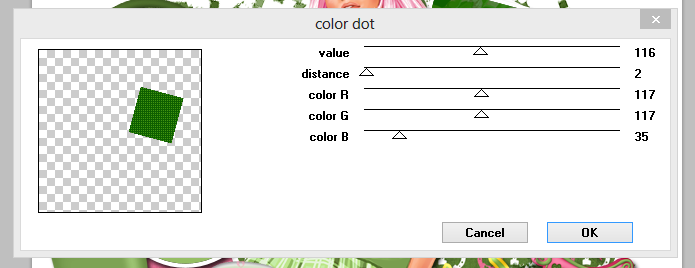
Add the settings for Penta Color Dot below to both circles.
Move Paper2 to the square in front and adjust to your liking.
Create a clipping mask.
Move Paper1 to the square in the back and adjust as well.
Create a clipping mask.
Move Paper13 to both brackets
Create a clipping mask.
Move Fence 2 behind the template so it sticks out on the left hand side. Resize so it's smaller. Add a drop shadow.
Duplicate the fence and move it to the right side of the template.
Move the grass behind the fence.
Add a drop shadow.
Move Weeds to the left hand side behind the fence, but in front of the grass. Resize so it just hangs outside the fence a little. Add a drop shadow.
Duplicate Weeds and flip horizontally then move to the right side with the fence.
Add the FlowerFloaties on top of the circles but behind the squares. Duplicate a few times to get it to cover the parts of the circles peeking out.
Move the tube in front of the template and resize.
Move a close up of the tube on top of both papers 1 & 2.
Change the opacity to 60%.
Add Xero Porcelain and Xero Radiance to main tube including the copies. Follow the settings below.
Move Branch1 to the left side of the smaller circle.
Rotate so it is vertical.
Add a drop shadow.
Duplicate Branch1 and flip it horizontally.
Move to the opposite side of the larger circle.
Repeat the process above with Flowers1 on top of the branches.
Move a new copy of Branch1 above the tube layer. Make it smaller than the branches from earlier and add a drop shadow. Make a total of three copies of Branch1 and line them up across the template.
Move Vines1 on top of the branches. Have one Vines1 on the left end of the branches and flip a duplicate and move it to the right end of the branches. Add a drop shadow to both.
Move RowofFlowers above the branches and vines. Resize so it doesn't go outside the fences. Add a drop shadow.
Move Puppy1 above the RowofFlowers on the right side. Resize and add a drop shadow.
You can add Xero Porcelain to the Puppy1 if you like. The settings are below (same as the tube).
Move Bow3 on top of the RowofFlowers. Resize to a small size and add a drop shadow. Duplicate and move to the opposite end of the RowofFlowers.
Move Butterfly1 on top of the bracket on the right. Resize and add a drop shadow.
Duplicate Butterfly1 and move it to the bottom left hand corner.
Open a new canvas, size 600x600, for the mask.
Open Paper8 and resize to 600x600 and move onto the blank canvas.
Move DCMask_19 on top of the paper.
Remove the white background and move mask to the lowest layer. Resize so it covers the background, but does not hang off the edge.
Add the name, copyright, and tagger mark.
Crop off any extra canvas, save as a .psd and .png.
Hope you enjoyed; this kit is perfect for Spring!
Thursday, March 14, 2013
Sunday, March 10, 2013
PTU "The First Day of Spring" Tutorial
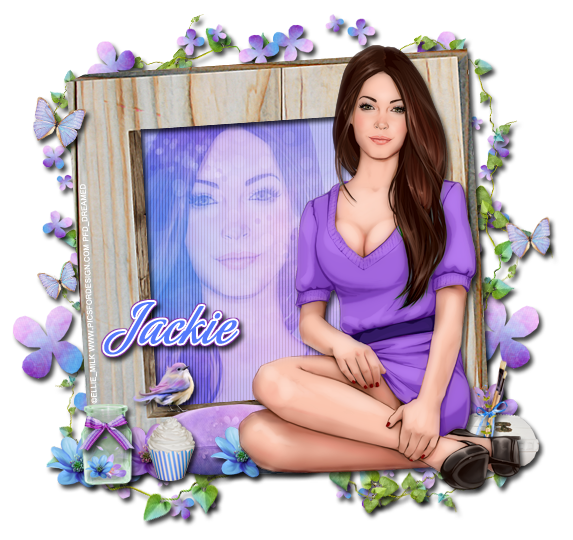
PTU Tutorial with "The First Day of Spring" from Jackie's Jewels with the artwork of Ellie Milk.
*This tutorial was written for those with a working knowledge of Photoshop*
Tools
Font used:
Inoxida
Tube used:
Elena by Ellie Milk
You can find her at PicsForDesign
*You must purchase this tube and obtain a license to use it.*
Filters used:
Xero Porcelain
Xero Soft Vignette
Elements used:
Bird2
Bow1
Box
Brushes
Butterfly
Cupcake2
Flower 1
Flower 2
FlowerScatter
Frame1
JarofFlowers
Pillow
Vine2
Paper used:
Paper6
Ready? Let's get started!
Open a new canvas, size 650x650.
Drag Frame1 over to blank canvas and resize.
Add a drop shadow.
Drag paper6 behind the frame. Resize and remove any excess paper outside the frame.
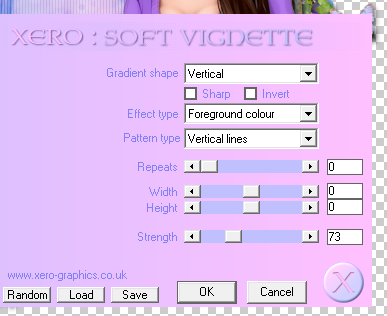
Add the Xero Soft Vignette settings to paper6 like this:
Drag your tube in front of frame and resize.
Add a drop shadow.
Add the Xero Porcelain settings to the tube like this:
Drag a copy of the tube behind the frame and on top of the paper.
Flip horizontally.
Erase any extras outside the frame.
Add the same settings for Xero Porcelain to the "reflection" tube.
Reduce Fill to 50%.
Now drag Vine2 behind the frame and paper and place it around the frame.
You will need to duplicate the vine2 layer a few times. Move each new vine2 layer around until it goes around the frame. Add a drop shadow to each vine2 layer.
Drag the FlowerScatter behind the frame on the left side. Resize so a little sticks out on the side and top and bottom. Add a drop shadow.
Duplicate FlowerScatter layer and flip it horizontally and move it behind the right side of the frame.
Drag the butterfly over and resize it a few times around the frames. You can use different sizes of the butterfly facing different directions. Add a drop shadow.
Place Bird2 of the ledge of the frame. Add a drop shadow.
Drag the pillow behind the tube, but on top of the frame. Resize and add a drop shadow.
Drag the box behind the tube where the shoes are. Resize and add a drop shadow.
Drag the brushes on top of the box. Turn them at an angle, resize, and add a drop shadow.
Drag the JarofFlowers to bottom left hand corner of the frame, resize, and add a drop shadow.
Drag Bow1 on top of he JarofFlowers, resize, and a add a drop shadow.
Drag Flower1 and place one behind the JarofFlowers and Pillow. Resize and add a drop shadow.
Drag Flower2 and place one behind the JarofFlowers to the left of it and on top of the Pillow. Resize and add a drop shadow.
Drag the cupcake2 on top of the pillow the left of it. Resize and add a drop shadow.
Now for the name:
The font is #567afb with a white stroke, size 2.
Select the pixels of the name layer and expand by 3.
Fill it with the color #8731ac and add a drop shadow.
Add your copyright information and tagger mark.
Crop off any extras.
Save as .psd and .png.
This is a perfect Spring kit! I hope you enjoy the tutorial. Thank you for looking!
PTU Luck You Tutorial
PTU Tutorial with Lucky You from Scrappin Krazy Designs with the artwork of Ellie Milk.
You can find this beautiful kit here: Lucky You
*This tutorial was written for those with a working knowledge of Photoshop*
Tools
Font used:
KG Luck of the Irish
Find it at dafont
Template used:
CBN_TemplateMisfits2
You can find it at Creative By Nature
Maya by Ellie Milk
You can find her at PicsForDesign
*You must purchase this tube and obtain a license to use it*
Filters used:
Xero Porcelain
Xero Radiance
Penta Color Dot
Elements used:
ele06
ele09
ele10
ele11
ele14
ele15
ele17
ele18
ele30
ele32
ele35
ele37
ele42
Paper used:
p11
p12
Alright, let's get started!
Open a new canvas, size 650x65. (Yours can be smaller or larger, if you prefer.)
Open your template.
Select all layers of the template that you want to keep and link them together.
Drag over to blank canvas and resize as needed.
Unlink the layers.
Drag p12 over to "copy of vector 1" above the Raster 2 layer.
Resize as needed.
Create a clipping mask.
Drag p11 over Raster 3 layer.
Resize as needed.
Create a clipping mask.
Select layer "copy of vector 1" above the Raster 6 layer.
Fill it with a dark green color - #2d5e00
Add Penta - Color Dots
Select layer "copy of vector 1" above the Raster 5 layer.
Fill it with a light green color - #95be63
Again add Penta - Color Dots
Drag ele32 behind the template and treat it as a mask.
Resize as needed.
Make sure nothing is cut off.
Move the word art (link the layers together) to the middle-right of the template.
For Raster 8, "beautiful", use these blending options:
Drop shadow
Color Overlay - White (#ffffff)
Stroke:
Size - 3
Color - #194f00
For Raster 7, "Irish Babe", make it the same dark green as earlier - #2d5e00.
Add Penta - Color Dots
Add drop shadow to Raster 9, not Raster 7.
Drag your tube of choice to about the middle of the template, behind the word art.
Add drop shadow.
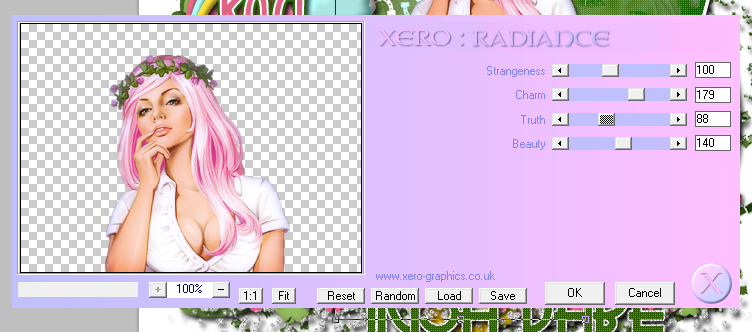
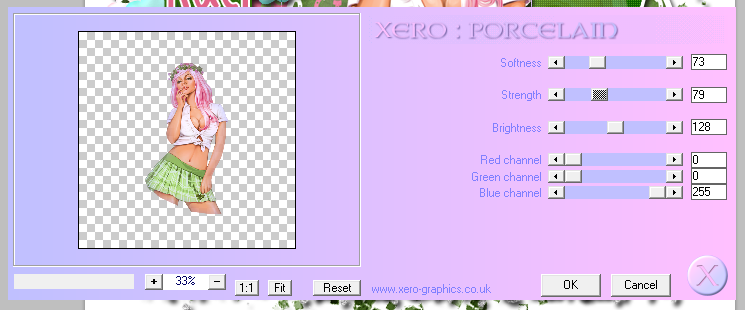
Add filters to tube. Follow the images below:
Xero Porcelain
Xero Radiance
Drag ele37 behind the word art, but in front of the tube.
Resize as needed.
Add a drop shadow.
Now add (in order from left to right) ele14, ele11, ele15, ele30, ele9, ele10 behind ele37.
Resize them as needed.
Add a drop shadow to each element.
Drag ele17 and place at an angle over the top left hand corner of the template.
Resize as needed.
Add a drop shadow.
Drag ele35 over the green layer of Raster 5 (small circle).
Resize as needed.
Add a drop shadow.
Add noise (glitter effect) if you like.
Drag ele06 to the bottom left hand corner of the green layer of Raster 6.
Resize as needed.
Add a drop shadow.
Drag ele18 between the large green circle and the small green square.
Rotate it so that is vertical at an angle.
Resize as needed.
Add a drop shadow.
Drag ele42 on top of the paper clipped to Raster 2's vector copy.
Resize as you like (create a clipping mask to avoid any hanging out).
For the name use KG Luck of the Irish font.
I placed it over the rainbow.
The name is #e06387.
The stroke is white (#fffff), size 2.
Select the pixels of the name layer and expand by 3 or 4 (depending on preference).
Fill with color #2d6907.
Add a drop shadow the the green layer of the name.
Add copyright information and tagger mark.
Crop out any extra canvas and save your .psd and .png.
I had fun with this kit and I know you will too. Thanks for looking!
Subscribe to:
Comments (Atom)


