

PTU Tutorial with Lucky You from Scrappin Krazy Designs with the artwork of Ellie Milk.
You can find this beautiful kit here: Lucky You
*This tutorial was written for those with a working knowledge of Photoshop*
Tools
Font used:
KG Luck of the Irish
Find it at dafont
Template used:
CBN_TemplateMisfits2
You can find it at Creative By Nature
Maya by Ellie Milk
You can find her at PicsForDesign
*You must purchase this tube and obtain a license to use it*
Filters used:
Xero Porcelain
Xero Radiance
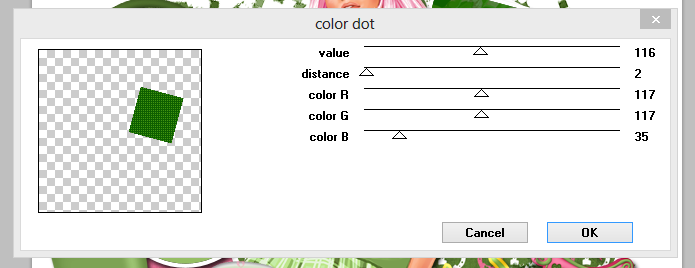
Penta Color Dot
Elements used:
ele06
ele09
ele10
ele11
ele14
ele15
ele17
ele18
ele30
ele32
ele35
ele37
ele42
Paper used:
p11
p12
Alright, let's get started!
Open a new canvas, size 650x65. (Yours can be smaller or larger, if you prefer.)
Open your template.
Select all layers of the template that you want to keep and link them together.
Drag over to blank canvas and resize as needed.
Unlink the layers.
Drag p12 over to "copy of vector 1" above the Raster 2 layer.
Resize as needed.
Create a clipping mask.
Drag p11 over Raster 3 layer.
Resize as needed.
Create a clipping mask.
Select layer "copy of vector 1" above the Raster 6 layer.
Fill it with a dark green color - #2d5e00
Add Penta - Color Dots
Select layer "copy of vector 1" above the Raster 5 layer.
Fill it with a light green color - #95be63
Again add Penta - Color Dots
Drag ele32 behind the template and treat it as a mask.
Resize as needed.
Make sure nothing is cut off.
Move the word art (link the layers together) to the middle-right of the template.
For Raster 8, "beautiful", use these blending options:
Drop shadow
Color Overlay - White (#ffffff)
Stroke:
Size - 3
Color - #194f00
For Raster 7, "Irish Babe", make it the same dark green as earlier - #2d5e00.
Add Penta - Color Dots
Add drop shadow to Raster 9, not Raster 7.
Drag your tube of choice to about the middle of the template, behind the word art.
Add drop shadow.
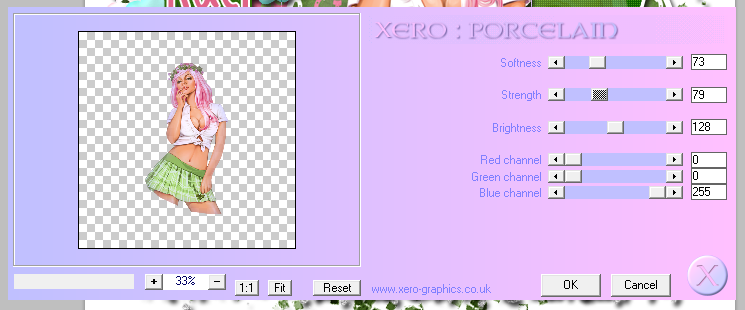
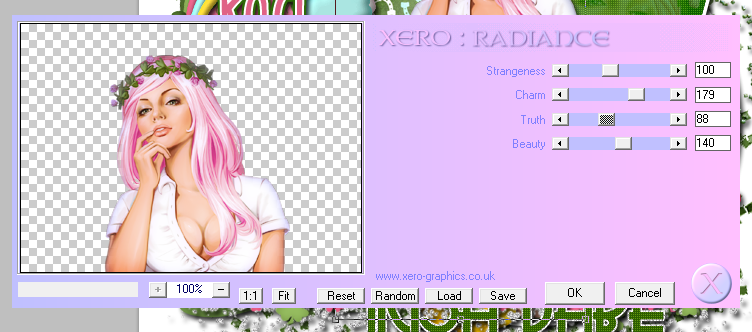
Add filters to tube. Follow the images below:
Xero Porcelain
Xero Radiance
Drag ele37 behind the word art, but in front of the tube.
Resize as needed.
Add a drop shadow.
Now add (in order from left to right) ele14, ele11, ele15, ele30, ele9, ele10 behind ele37.
Resize them as needed.
Add a drop shadow to each element.
Drag ele17 and place at an angle over the top left hand corner of the template.
Resize as needed.
Add a drop shadow.
Drag ele35 over the green layer of Raster 5 (small circle).
Resize as needed.
Add a drop shadow.
Add noise (glitter effect) if you like.
Drag ele06 to the bottom left hand corner of the green layer of Raster 6.
Resize as needed.
Add a drop shadow.
Drag ele18 between the large green circle and the small green square.
Rotate it so that is vertical at an angle.
Resize as needed.
Add a drop shadow.
Drag ele42 on top of the paper clipped to Raster 2's vector copy.
Resize as you like (create a clipping mask to avoid any hanging out).
For the name use KG Luck of the Irish font.
I placed it over the rainbow.
The name is #e06387.
The stroke is white (#fffff), size 2.
Select the pixels of the name layer and expand by 3 or 4 (depending on preference).
Fill with color #2d6907.
Add a drop shadow the the green layer of the name.
Add copyright information and tagger mark.
Crop out any extra canvas and save your .psd and .png.
I had fun with this kit and I know you will too. Thanks for looking!

No comments:
Post a Comment