
**This tutorial was written for those with a working knowledge of Photoshop.**
Tools
Mask
I used my mask, DCMask_19, which you can find on my blog here.
Template
By Missy from Divine Intentionz
Font
Inspiration
Tube
Sookie by Freya Langford-Sidebottom
You can find it here.
*You must purchase this tube and obtain a license to use it.*
Filters
Xero Porcelain
Xero Radiance
Penta Color Dot
Elements
Bow3
Branch1
Butterfly1
Fence2
Flowers1
FlowerFloaties
Grass
Puppy1
RowofFlowers
Vines1
Weeds
Papers
Paper1
Paper2
Paper5
Paper8
Paper13
All set? Let's go :)
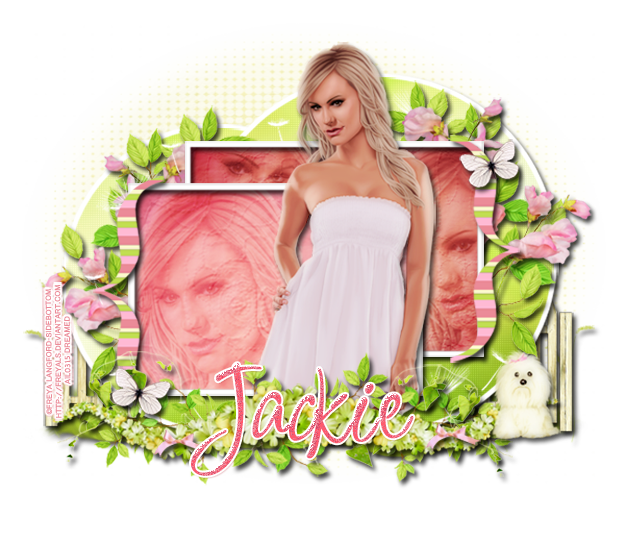
Open a new canvas, I made it 650x650.
Open the template and link all the layers you want together.
Move the linked layers onto the blank canvas. Unlink the layers.
Move Paper5 to the large circle and adjust the paper to your liking.
Create a clipping mask.
Move Paper5 to the second, smaller circle and adjust like before.
Create a clipping mask.
Add the settings for Penta Color Dot below to both circles.
Move Paper2 to the square in front and adjust to your liking.
Create a clipping mask.
Move Paper1 to the square in the back and adjust as well.
Create a clipping mask.
Move Paper13 to both brackets
Create a clipping mask.
Move Fence 2 behind the template so it sticks out on the left hand side. Resize so it's smaller. Add a drop shadow.
Duplicate the fence and move it to the right side of the template.
Move the grass behind the fence.
Add a drop shadow.
Move Weeds to the left hand side behind the fence, but in front of the grass. Resize so it just hangs outside the fence a little. Add a drop shadow.
Duplicate Weeds and flip horizontally then move to the right side with the fence.
Add the FlowerFloaties on top of the circles but behind the squares. Duplicate a few times to get it to cover the parts of the circles peeking out.
Move the tube in front of the template and resize.
Move a close up of the tube on top of both papers 1 & 2.
Change the opacity to 60%.
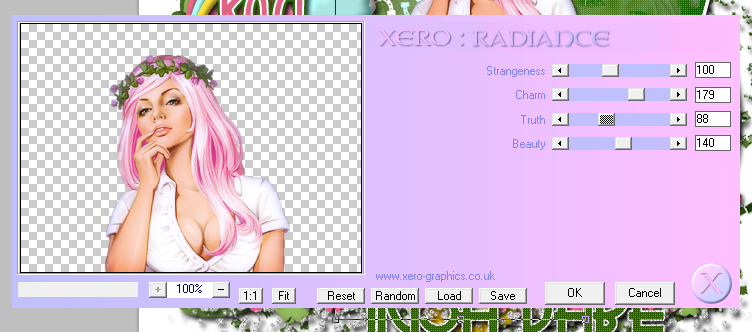
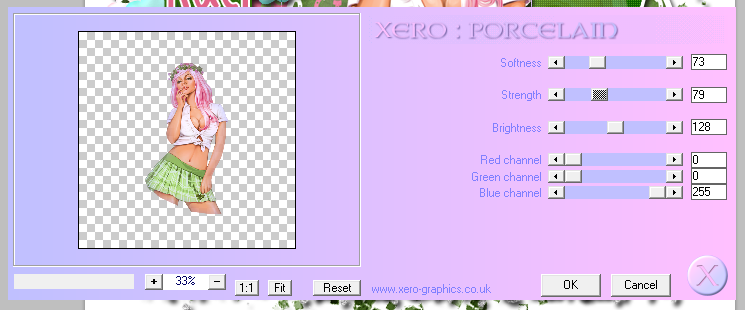
Add Xero Porcelain and Xero Radiance to main tube including the copies. Follow the settings below.

Move Branch1 to the left side of the smaller circle.
Rotate so it is vertical.
Add a drop shadow.
Duplicate Branch1 and flip it horizontally.
Move to the opposite side of the larger circle.
Repeat the process above with Flowers1 on top of the branches.
Move a new copy of Branch1 above the tube layer. Make it smaller than the branches from earlier and add a drop shadow. Make a total of three copies of Branch1 and line them up across the template.
Move Vines1 on top of the branches. Have one Vines1 on the left end of the branches and flip a duplicate and move it to the right end of the branches. Add a drop shadow to both.
Move RowofFlowers above the branches and vines. Resize so it doesn't go outside the fences. Add a drop shadow.
Move Puppy1 above the RowofFlowers on the right side. Resize and add a drop shadow.
You can add Xero Porcelain to the Puppy1 if you like. The settings are below (same as the tube).
Move Bow3 on top of the RowofFlowers. Resize to a small size and add a drop shadow. Duplicate and move to the opposite end of the RowofFlowers.
Move Butterfly1 on top of the bracket on the right. Resize and add a drop shadow.
Duplicate Butterfly1 and move it to the bottom left hand corner.
Open a new canvas, size 600x600, for the mask.
Open Paper8 and resize to 600x600 and move onto the blank canvas.
Move DCMask_19 on top of the paper.
Remove the white background and move mask to the lowest layer. Resize so it covers the background, but does not hang off the edge.
Add the name, copyright, and tagger mark.
Crop off any extra canvas, save as a .psd and .png.
Hope you enjoyed; this kit is perfect for Spring!

No comments:
Post a Comment