

PTU Tutorial with "The First Day of Spring" from Jackie's Jewels with the artwork of Ellie Milk.
*This tutorial was written for those with a working knowledge of Photoshop*
Tools
Font used:
Inoxida
Tube used:
Elena by Ellie Milk
You can find her at PicsForDesign
*You must purchase this tube and obtain a license to use it.*
Filters used:
Xero Porcelain
Xero Soft Vignette
Elements used:
Bird2
Bow1
Box
Brushes
Butterfly
Cupcake2
Flower 1
Flower 2
FlowerScatter
Frame1
JarofFlowers
Pillow
Vine2
Paper used:
Paper6
Ready? Let's get started!
Open a new canvas, size 650x650.
Drag Frame1 over to blank canvas and resize.
Add a drop shadow.
Drag paper6 behind the frame. Resize and remove any excess paper outside the frame.
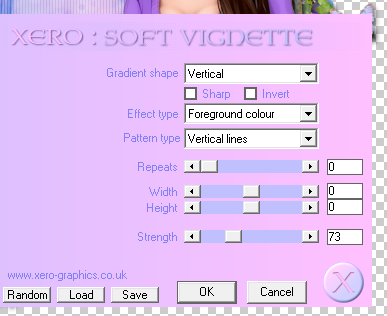
Add the Xero Soft Vignette settings to paper6 like this:
Drag your tube in front of frame and resize.
Add a drop shadow.
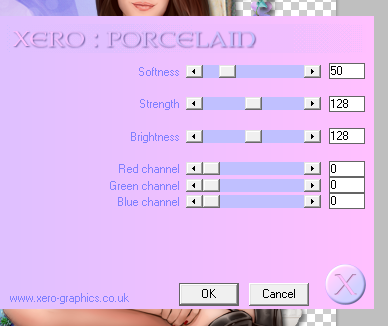
Add the Xero Porcelain settings to the tube like this:
Drag a copy of the tube behind the frame and on top of the paper.
Flip horizontally.
Erase any extras outside the frame.
Add the same settings for Xero Porcelain to the "reflection" tube.
Reduce Fill to 50%.
Now drag Vine2 behind the frame and paper and place it around the frame.
You will need to duplicate the vine2 layer a few times. Move each new vine2 layer around until it goes around the frame. Add a drop shadow to each vine2 layer.
Drag the FlowerScatter behind the frame on the left side. Resize so a little sticks out on the side and top and bottom. Add a drop shadow.
Duplicate FlowerScatter layer and flip it horizontally and move it behind the right side of the frame.
Drag the butterfly over and resize it a few times around the frames. You can use different sizes of the butterfly facing different directions. Add a drop shadow.
Place Bird2 of the ledge of the frame. Add a drop shadow.
Drag the pillow behind the tube, but on top of the frame. Resize and add a drop shadow.
Drag the box behind the tube where the shoes are. Resize and add a drop shadow.
Drag the brushes on top of the box. Turn them at an angle, resize, and add a drop shadow.
Drag the JarofFlowers to bottom left hand corner of the frame, resize, and add a drop shadow.
Drag Bow1 on top of he JarofFlowers, resize, and a add a drop shadow.
Drag Flower1 and place one behind the JarofFlowers and Pillow. Resize and add a drop shadow.
Drag Flower2 and place one behind the JarofFlowers to the left of it and on top of the Pillow. Resize and add a drop shadow.
Drag the cupcake2 on top of the pillow the left of it. Resize and add a drop shadow.
Now for the name:
The font is #567afb with a white stroke, size 2.
Select the pixels of the name layer and expand by 3.
Fill it with the color #8731ac and add a drop shadow.
Add your copyright information and tagger mark.
Crop off any extras.
Save as .psd and .png.
This is a perfect Spring kit! I hope you enjoy the tutorial. Thank you for looking!

No comments:
Post a Comment