*Coming Soon!*
PTU tutorial using Rebell by José Cano!
Matching kit made by Desirena Designs!
You can purchase them both here soon!
**This tutorial was written by me and any resemblance is purely coincidental. It is written for those with a working knowledge of Photoshop.**
Supplies
Font
Mask
Scrap Kit
Tube
*You must obtain a license to use this tube.*
Elements
1
2
3
4
13
24
30
Papers
9
12
Let's start!
Open a new canvas, size 650x650.
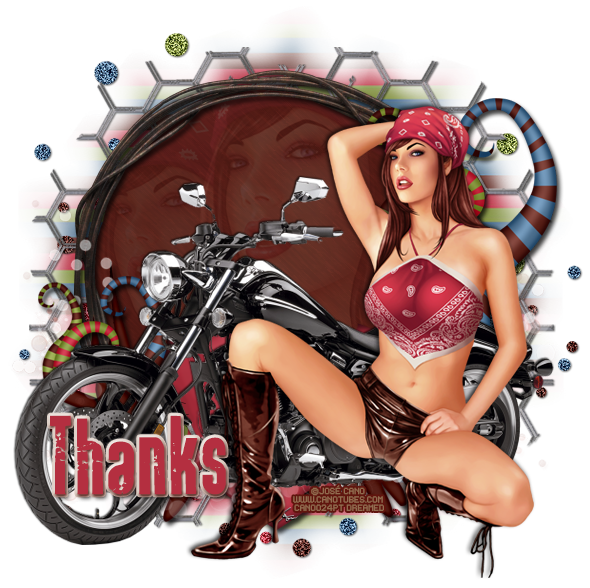
Place ele4 on the canvas. Resize and add a drop shadow.
Add a new layer below the frame and fill with #561d16.
Erase anything sticking outside the frame.
Place the tube in front of the frame and to the right a little. Resize and add a drop shadow.
Place ele2 between the tube and the frame. Resize and add a drop shadow.
On the bottom of the frame, place ele1. Resize and add a drop shadow.
On top of ele1, place ele30 and resize.
Behind ele3, place ele24. Resize and add a drop shadow.
Behind the tube on the right, place ele 13 on top of the frame. Resize and add a drop shadow. Erase anything hanging below the bike.
Take another copy of ele13 and place it behind the bike on the left side. Flip horizontally and resize so it's smaller than the one on the right side. Add a drop shadow.
Now take the close up of the tube and place it on top of the brown paper behind the frame. Resize so at least half of her face is showing to the left of the tube.
Change to Screen and drop fill to 15%.
Take another close up of the tube and place it to the left of the first layer. Resize, but make sure you can see her face over the bike. Change to Screen and drop fill to 10%.
Place ele4 on the canvas. Resize and add a drop shadow.
Add a new layer below the frame and fill with #561d16.
Erase anything sticking outside the frame.
Place the tube in front of the frame and to the right a little. Resize and add a drop shadow.
Place ele2 between the tube and the frame. Resize and add a drop shadow.
On the bottom of the frame, place ele1. Resize and add a drop shadow.
On top of ele1, place ele30 and resize.
Behind the frame on the left, place ele3. Rotate 90 degrees CW and move so it sticks out just a little. Add a drop shadow.
Duplicate ele3 and flip horizontally. Move to the right side.Behind ele3, place ele24. Resize and add a drop shadow.
Behind the tube on the right, place ele 13 on top of the frame. Resize and add a drop shadow. Erase anything hanging below the bike.
Take another copy of ele13 and place it behind the bike on the left side. Flip horizontally and resize so it's smaller than the one on the right side. Add a drop shadow.
Now take the close up of the tube and place it on top of the brown paper behind the frame. Resize so at least half of her face is showing to the left of the tube.
Change to Screen and drop fill to 15%.
Take another close up of the tube and place it to the left of the first layer. Resize, but make sure you can see her face over the bike. Change to Screen and drop fill to 10%.
Name
Main color is #b42f3f.
Add a bevel and change to outer bevel.
Change to size 4 and change the shadow mode to #561d16.
Add a stroke, size 3, in #d6c5ba.
Mask
Open a new canvas, size 600x600.
Open paper 9 and resize to 600x600. Place on top of the canvas.
Open the mask and move on top of the paper.
Remove the white background and place the mask behind the tag.
Make it evenly stretched on all sides.
Add your tagger mark and copyright information.
Crop off any extra canvas.
Save as a .psd & .png.
Free snags!
Thank you for stopping by!


