**This tutorial was written by me and any resemblance is purely coincidental. It is written for those with a working knowledge of Photoshop.**
Scrap Kit
Tubes
*You must obtain a license to use this tube.*
Elements
arrows
bracket
broken glass
car
fence
frame1
gas pump
hat
license plate 2
lipstick
makeup
nail polish
screw 1
sign1
speedometer
steering wheel
tire stack
tire tracks
tire
traffic light
word art
Papers
1
12
Let's start!
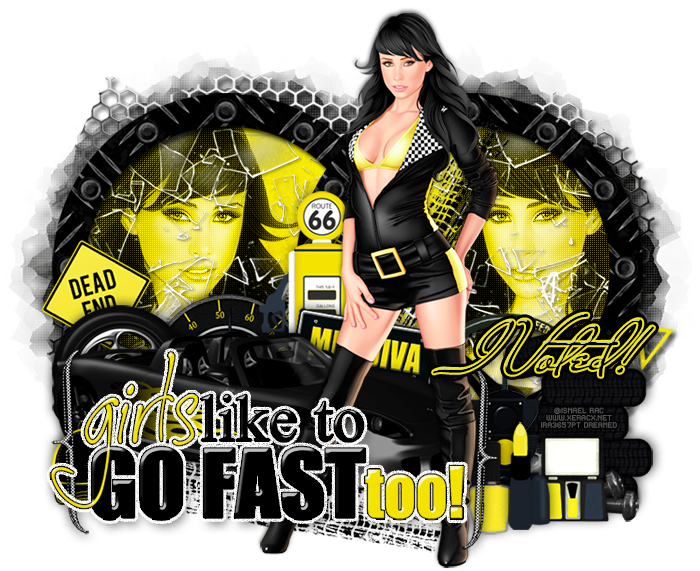
Open a new canvas, size 700x700.
Place frame1 on the canvas and resize so you can fit another frame on the canvas.
Duplicate the frame and overlap them a little. Add a drop shadow to both.
Place the tube in front of the frames. Resize and add a drop shadow.
Place paper 1 behind the frames. Erase anything outside the frames.
Take a close up of the tube and place it on the paper on the right. Create a clipping mask to the paper and change to luminosity.
Duplicate the tube close up and flip horizontally then move to the frame on the left.
On top of the tube close up on the left place the broken glass. Resize and add a drop shadow.
Duplicate the broken glass and move to the right frame. Select both layer of the glass and create a clipping mask to the paper.
Place the fence behind the frames on the upper left side. Resize as needed. Duplicate the fence so it can cover the upper right side. Make sure nothing hangs off the canvas. Erase the fence on the right where it overlaps the fence on the left.
Duplicate the fences, flip vertically and then horizontally. Again, erase the area of the one on the right where the fence overlaps. Add a drop shadow to each fence layer.
Place the car in front of the frame on the left and behind the tube. Resize and add a drop shadow.
In front of the car and toward the left end of it place the hat. Resize and add a drop shadow.
Behind the car in the middle of the frames place the gas pump. Resize and add a drop shadow.
Behind the gas pump and on the left place the speedometer. Resize and add a drop shadow.
Behind the car on the left of the speedometer place the tire on top of the speedometer.
Behind the tire on top of the frame place sign1. Resize and add a drop shadow.
In front of the gas pump and a little to the right place license plate2. Resize and add a drop shadow.
On the right side of the frames place the tire stack. Resize and add a drop shadow.
Behind the tire stack and license plate place the steering wheel. Resize and add a drop shadow.
In front of the car and tire stack place the traffic light. Resize and add a drop shadow.
Behind the tube and in front of the traffic light and tire stack place the nail polish to the right of the tube. Resize and add a drop shadow.
To the right of the nail polish place the lipstick. Resize and add a drop shadow.
to the right of the lipstick place the makeup. Resize and add a drop shadow.
Between the makeup and the tire stack place screw1. Resize and add a drop shadow.
Duplicate the screw and lay it on top of the first one.
Behind the tube on top of the frame on the right place the tire tracks and resize.
Take a fresh copy of the tire tracks and place them below the car and tube and resize.
Place the arrows on top of the frame on the right and behind the tire track. Resize and add a drop shadow.
On top of everything and to the left a little place the word art. Add a bevel, drop shadow, and white noise.
Place a bracket on the left side of the word art. Resize and add a drop shadow.
Duplicate the word art and move it to the right side of the word art.
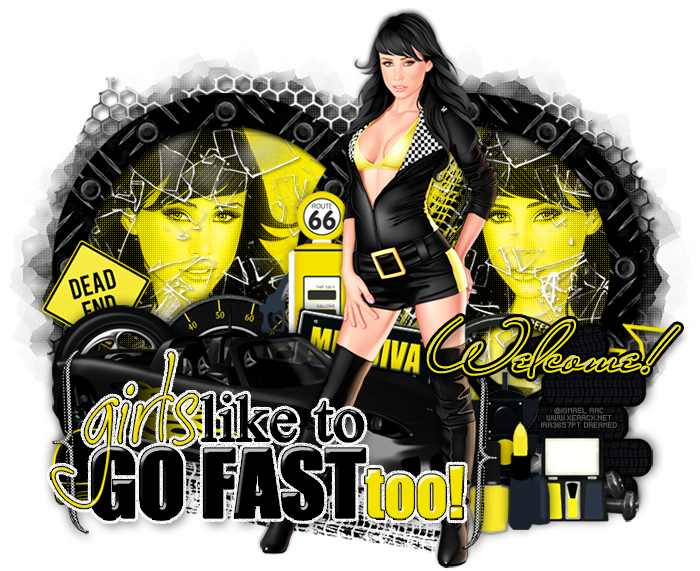
Add your tagger mark and copyright information.
Crop off any extra canvas.
Save as a .psd & .png.
Free snags!
Thank you for coming by!