**This tutorial was written by me and any resemblance is purely coincidental. It is written for those with a working knowledge of Photoshop.**
Scrap Kit
Template
Tube
*You must obtain a license to use this tube.*
Elements
Butterflies
Cards
Flamingo
Grass
Mushrooms
Paint Brush
Queen
Shrub
Sparkles
Swirl
Papers
1
2
6
11
12
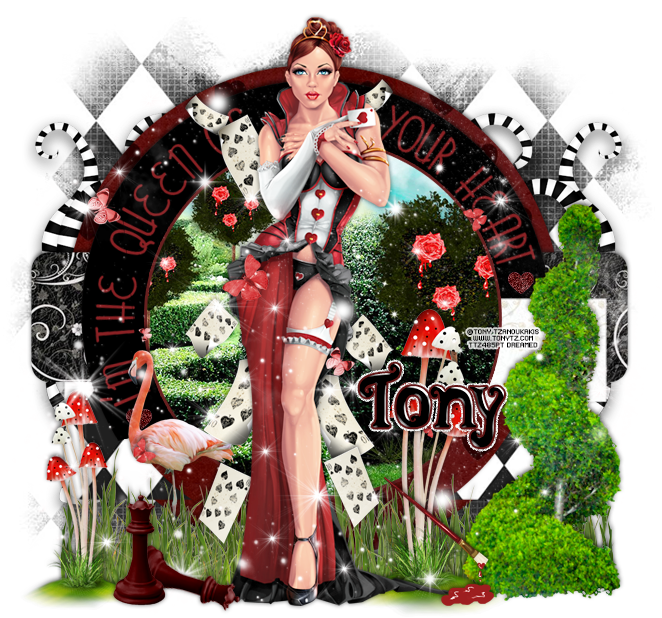
Let's Start!
Open a new canvas, size 650x650.
Open the template and move it on to the canvas. Resize as necessary.
Remove layers 9 and Raster 1.
Add a drop shadow to each layer.
Place paper 1 over layer 1 and create a clipping mask. You'll need to resize it in order to see the hearts.
Duplicate paper 1 and place it over layer 3 as well.
Place paper 2 over layer 2 and resize then create a clipping mask.
Place paper 11 over layer 4 and resize then create a clipping mask.
Change the color of layer 5 and fill with black.
Place paper 12 over layer 6 and resize then create a clipping mask.
You can leave the word art spacing alone if you don't mind the tube overlapping it, but I preferred to space it out around the tube.
Duplicate the word art and erase "your heart" from the first copy and leave the rest. With the second copy erase "I'm the queen of". Now you can move those two around and resize as needed so they are both showing.
Change the color of the word art and hearts to #8b2124.
I also resized layers 10 and 11 (hearts) to a smaller size to accommodate the changes in the word art. Make them the same color as the word art and add a light noise to both.
Place paper 6 over layer 8 and resize then create a clipping mask.
Place the tube in front of the tag in between the word art (if you did the steps above). Resize and add a drop shadow.
Directly behind the tube place the cards. Resize and add a drop shadow.
Duplicate the cards and flip horizontally to fill in the empty space behind the tube.
On top of the tube place the butterflies. Resize and add a drop shadow.
Behind the tube along the ground place the grass. Resize and duplicate to cover the length of the template. Add a drop shadow.
In front of the grass on the right place the shrub. Resize and add a drop shadow.
Between the tube (and behind her) and the shrub place the mushrooms. Resize and add a drop shadow.
In front of the mushrooms and shrub place the paint brush. Resize and add a drop shadow.
To the left of the tube and in front of the grass on the end place a smaller copy of the mushrooms. Resize and add a drop shadow.
Between the tube and the mushrooms on the left place the queen. Resize and add a drop shadow.
Duplicate the queen and rotate it so it's laying down.
Behind the grass on the left place the flamingo. Resize and add a drop shadow.
In front of the template use the grass to fill in empty space. Just duplicate the grass from before and fill in the gaps.
Behind the template on the left and right place the swirl. Flip horizontally, resize, and add a drop shadow.
On top of everything place the sparkles. Duplicate the sparkles and repeat until the tag is covered. Erase anything covering the tube's face and hanging off the tag.
Add your tagger mark and copyright information.
Crop off any extra canvas.
Save as a .psd & .png.
Free snags!
Thank you for coming by!