

**This tutorial was written by me and any resemblance is purely coincidental. It is written for those with a working knowledge of Photoshop.**
Scrap Kit
Tube
*You must obtain a license to use this tube.*
Elements
4
8
18
19
21
22
34
35
36
37
55
56
59
85
89
91
96
102
103
104
105
106
114
115
Papers
11
13
Let's start!
Open a new canvas, size 700x700.
Place the tube on the canvas. Resize and add a drop shadow.
Place 56 below the tube so she is standing on it. Resize and add a drop shadow.
Below everything place 19 and resize. Move it to the left side to create the ground. Make sure it doesn't hang off the canvas.
Duplicate 19 and move it to the right side making sure it does not hang off the canvas. Duplicate it two more times and move both layers below the first two layers. Use these to cover the middle and finish the ground.
Behind the tube and the platform place 103. Resize and add a drop shadow. Move it to the left a little.
Behind the bookshelf place 4. Resize and add a drop shadow.
Duplicate 4 and move it to the right of the first one with a little space in between.
Move both windows to the right of the tag leaving a little space on the left side.
Behind the windows place paper 13. Resize and erase anything outside the windows.
On top of the paper place 96 and resize. Erase anything outside the frames.
Behind the cloud place 55 and flip horizontally. Place it in the frame on the left and resize. Erase anything outside the window.
On top of the windows place 59 and flip horizontally then have it lay on both windows with some of the web in the middle.
On the right side of the window on the right place 91 upright so it's stretched out hand is hanging off the corner. Resize and add a drop shadow.
To the right of the bookshelf and in front of the windows place 22. Resize and add a drop shadow.
Duplicate 22 and move it to the right of the first one. Make it a little smaller than the first.
To the right of the platform and in front of the candles place 89 and flip horizontally. Resize and add a drop shadow.
In front of the cauldron along the bottom, and to the right of the platform, place 114. Resize and add a drop shadow.
Behind the skull place 85. Resize and add a drop shadow.
In front of the pumpkin and to the right place 38. Resize and add a drop shadow.
Behind the hourglass place 37. Resize and add a drop shadow.
Behind the platform and in front of the bookshelf place 115 behind the cauldron and to the left a little. Resize and add a drop shadow.
On top of the platform and behind the tube's foot place 34. Resize and add a drop shadow.
Behind the tube and between her legs place 8 and flip horizontally. Resize and add a drop shadow.
Underneath the tube's foot on the left place 106. Resize and add a drop shadow.
On top of the papers and to the left place 40. Resize and add a drop shadow.
Between the bookshelf and the platform on the left place 44. Resize and add a drop shadow.
Leaning against the bookshelf in front of the bones on the left place 21. Resize and add a drop shadow.
Place 105 on the bookshelf toward the top. Resize and add a drop shadow.
To the left of the platform and in front of the broom and pile of bones place 18. Resize and add a drop shadow.
In front of the book on the left place 36. Resize and add a drop shadow.
On the right side of the book place 33. Resize and add a drop shadow.
Behind 33 place 35. Resize and add a drop shadow.
On top of the trophy on the bookshelf place 46. Resize and add a drop shadow.
On top of the pumpkin place 104. Resize and add a drop shadow.
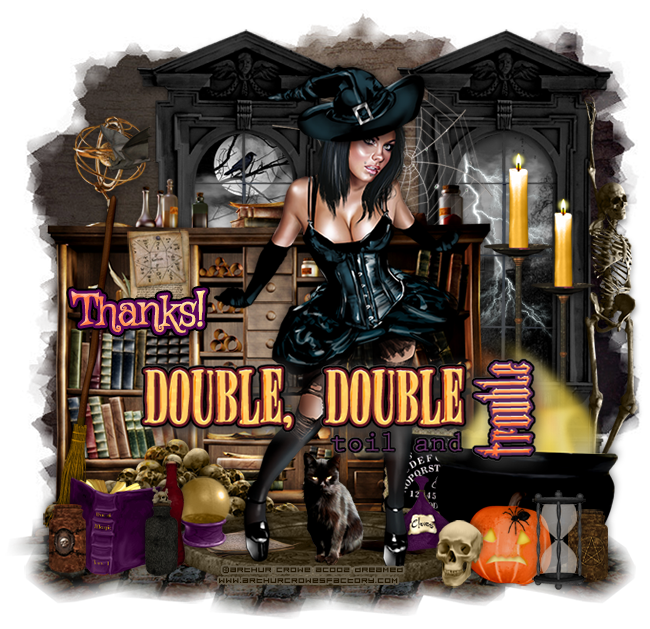
On top of the tube around the middle place 102. Because the tube is dark you'll need to add a little to the awesome word art. Select the pixels and expand by 2. Add a layer below the word art and fill with black. Add a drop shadow to the black layer.
Resize both as necessary.
Add your tagger mark and copyright information.


Place the tube on the canvas. Resize and add a drop shadow.
Place 56 below the tube so she is standing on it. Resize and add a drop shadow.
Below everything place 19 and resize. Move it to the left side to create the ground. Make sure it doesn't hang off the canvas.
Duplicate 19 and move it to the right side making sure it does not hang off the canvas. Duplicate it two more times and move both layers below the first two layers. Use these to cover the middle and finish the ground.
Behind the tube and the platform place 103. Resize and add a drop shadow. Move it to the left a little.
Behind the bookshelf place 4. Resize and add a drop shadow.
Duplicate 4 and move it to the right of the first one with a little space in between.
Move both windows to the right of the tag leaving a little space on the left side.
Behind the windows place paper 13. Resize and erase anything outside the windows.
On top of the paper place 96 and resize. Erase anything outside the frames.
Behind the cloud place 55 and flip horizontally. Place it in the frame on the left and resize. Erase anything outside the window.
On top of the windows place 59 and flip horizontally then have it lay on both windows with some of the web in the middle.
On the right side of the window on the right place 91 upright so it's stretched out hand is hanging off the corner. Resize and add a drop shadow.
To the right of the bookshelf and in front of the windows place 22. Resize and add a drop shadow.
Duplicate 22 and move it to the right of the first one. Make it a little smaller than the first.
To the right of the platform and in front of the candles place 89 and flip horizontally. Resize and add a drop shadow.
In front of the cauldron along the bottom, and to the right of the platform, place 114. Resize and add a drop shadow.
Behind the skull place 85. Resize and add a drop shadow.
In front of the pumpkin and to the right place 38. Resize and add a drop shadow.
Behind the hourglass place 37. Resize and add a drop shadow.
Behind the platform and in front of the bookshelf place 115 behind the cauldron and to the left a little. Resize and add a drop shadow.
On top of the platform and behind the tube's foot place 34. Resize and add a drop shadow.
Behind the tube and between her legs place 8 and flip horizontally. Resize and add a drop shadow.
Underneath the tube's foot on the left place 106. Resize and add a drop shadow.
On top of the papers and to the left place 40. Resize and add a drop shadow.
Between the bookshelf and the platform on the left place 44. Resize and add a drop shadow.
Leaning against the bookshelf in front of the bones on the left place 21. Resize and add a drop shadow.
Place 105 on the bookshelf toward the top. Resize and add a drop shadow.
To the left of the platform and in front of the broom and pile of bones place 18. Resize and add a drop shadow.
In front of the book on the left place 36. Resize and add a drop shadow.
On the right side of the book place 33. Resize and add a drop shadow.
Behind 33 place 35. Resize and add a drop shadow.
On top of the trophy on the bookshelf place 46. Resize and add a drop shadow.
On top of the pumpkin place 104. Resize and add a drop shadow.
On top of the tube around the middle place 102. Because the tube is dark you'll need to add a little to the awesome word art. Select the pixels and expand by 2. Add a layer below the word art and fill with black. Add a drop shadow to the black layer.
Resize both as necessary.
Add your tagger mark and copyright information.
Crop off any extra canvas and resize the tag as needed.
Save as a .psd & .png.
Free snags!
Thanks for coming by!

No comments:
Post a Comment