
*Coming Soon!*
PTU tutorial using 2014 Hot Legs by Ismael Rac with the matching kit by Kizzed By Kelz.

**This tutorial was written by me and any resemblance is purely coincidental. It is written for those with a working knowledge of Photoshop.**
Supplies
Scrap Kit
Template
Tube
*You must obtain a license to use this tube.*
Elements
8
9
13
16
17
18
19
26
27
28
29
30
31
Papers
1
2
9
10
14
Let's start!
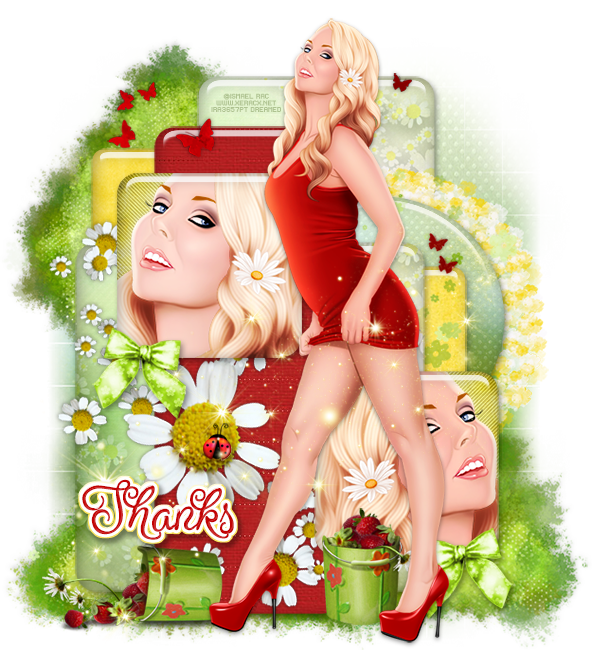
Open a new canvas, size 650x700.
Open the template and unclick the cr layer, 9, and 10.
Move the rest on to the canvas. Resize as necessary.
Add a bevel and a drop shadow to each template layer.
Place the tube in the front of the template. Resize and add a drop shadow.
Take a close up of the tube and place it over layer 7 and create a clipping mask. Resize her and move her around.
Place paper 9 behind the tube close up and create a clipping mask. Resize the paper so it's almost the same size as the square.
Repeat the same steps for layer 8, but flip the the tube close up so she's facing away.
Place paper 10 over layer 6. Move around until you see the white dotted lines and create a clipping mask.
Place paper 1 over layer 5 and create a clipping mask. Move the paper around and resize as necessary so you have some flowers visible in the lower left hand corner.
Duplicate paper1 and place it over layer 1 and create a clipping mask. Move the paper around so you have flowers in the upper right hand corner.
Place paper 14 over layer 3 so just the yellow paper shows. Resize and create a clipping mask.
Duplicate paper 14 and move it over layer 4 so just the yellow paper shows. Resize and create a clipping mask.
Place paper 2 over layer 2 and create a clipping mask. Resize and create a clipping mask.
Place ele16 on top of layer 6. Resize and rotate the flowers so the lay at diagonal. Erase any flowers hanging off the template too much.
Place ele19 on top of layer 3 and flip so it's the opposite of the flowers. Delete anything hanging off the template.
Place ele27 on top of layer 3. Resize and move around so you have random small butterflies around the top of the tag.
Behind layer 2, place ele26. Resize so it lays behind the circle.
Place ele8 on the bottom left corner of layer 7. Resize and add a drop shadow.
Duplicate ele8 and place on the bottom right corner of layer 8.
Place ele13 on a big flower from ele16. Resize and add a drop shadow.
Place ele18 behind the tube's foot on the left and resize.
Behind ele18, place a couple of ele9s. Resize and add a drop shadow.
Place ele17 behind the tube's foot and to the left of it a little. Resize and add a drop shadow.
Behind the template on the left, place ele29. Resize and add a drop shadow.
Behind the tag on the left side, place ele30. Resize and add a drop shadow.
Place ele31 behind the tag on the right. Flip horizontally, resize, and add a drop shadow.
On top of the tag and tube, place ele28. Place it the same way you did ele19. Resize and erase anything hanging off the tag.
Add your tagger mark and copyright information.
Crop off any extra canvas.
Save as a .psd & .png.
Free snags!
Thank you for coming by!
