
PTU Tutorial with Scrappin Krazy Designs' kit American Beauty and the artwork of Ismael Rac.

**This tutorial was written by me and any resemblance is purely coincidental. It is for those with a working knowledge of Photoshop.**
Tools
Tube
"Venom" by Ismael Rac.
You can purchase the tube here.
*You must obtain a license to use it.*
Mask
by K'Lani Designs, you can find it here.
Font
Native Alien
You can find it on dafont.
Elements
ele01
ele03
ele27
ele31
ele42
ele55
ele56
ele59
ele61
ele71
ele72
ele83
ele88
ele92
ele98
ele99
ele100
ele104
Papers
p07
p13
Have everything set up? Let's get started!
Open a new canvas, size 650x650. You can larger or smaller, if you like.
Move ele98 onto the canvas and resize. Add a drop shadow.
Move p13 behind the frame, postion, and erase extras outside the frame.
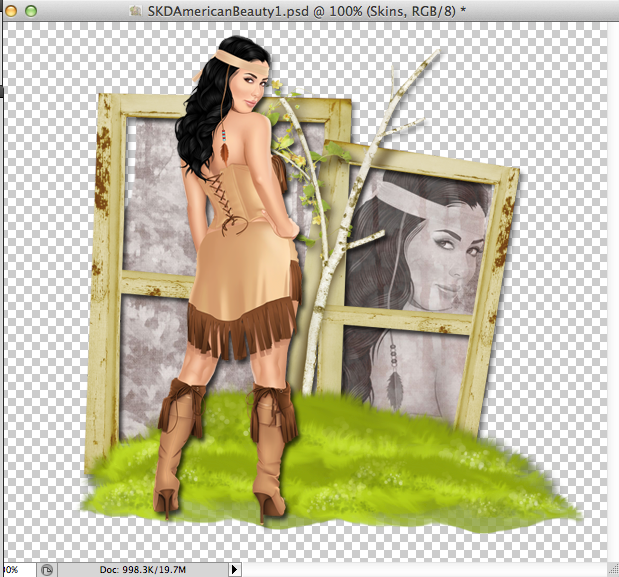
Move your tube in front of left side of the frame. Resize and add a drop shadow.
Take a duplicate of the tube, make it larger, and move it on top of p13 but behind the frame so it's a "reflection" of the tube in the window. Erase any extras hanging outside the frame.
On the reflection tube, change it to luminosity and the fill to 60%.
Move ele61 on top of the frame. Resize so it hangs off the frame a little on the right side of the frame and meets the edge of the frame on the left. Add a drop shadow.
Now take ele61 again and make it smaller to give it a hill effect. Have the left end of the hill meet the left side the frame too. Then duplicate the smaller size and move it to the right side so they overlap the in the middle and meet up with the larger grass background. Don't add a drop shadow to the smaller "hills". Here's a snapshot of how it should look now.
Move ele55 on top of the grass hills and frame, but behind the tube. Resize it so it sticks out just a tad over the top of the frame. It can stick out on the left side of the frame, but make sure it doesn't stick outside the canvas. Add a drop shadow.
Move ele03 on top of the tree trunk. Resize it so it does not stick outside the tree trunk. No drop shadow necessary.
Move ele99 onto the tree top. I placed it where the tree branch was sticking out. Resize it so it is appropriate to the size of the tree and add a drop shadow.
Move ele27 on top of the tree at the base of the trunk. Resize it and move it to the middle of the tree trunk. Duplicate ele37 and flip horizontally so they overlap in the middle. Add a drop shadow to both.
Move ele31 behind both ele27s and have it stick out the top, just under the paw print.
Move ele83 on top the tree limb in the middle of the frame. Flip it vertically and resize. Have the point at the bottom meet the top of the large hill background. Add a drop shadow.
Move ele88 on to the limb to the left, resize, and add a drop shadow.
Move ele92 behind the tree and between the large grass hill and the smaller grass hills. Resize so it doesn't stick too much outside the frame and the right side of the grass hills. Add a drop shadow.
Now move ele42 behind ele92 on the right side of the frame. Resize it so it stands as tall as the middle bar of the frame. Add a drop shadow.
Move another copy of ele42 in front of ele92. Make it much smaller than the first one. Add a drop shadow.
Move ele42 next to the tree on the right side. Move it in front of the large grass hill and behind the small grass hill on the left. It should be behind ele92. Make it smaller than the other one to where it touches the bottom of the tree top. Add a drop shadow.
Move ele56 on top of the smaller grass hill on the right size. Resize so the closed end of the log meets the middle of the small grass hill. Add a drop shadow.
Move ele104 on top of the tree log. Flip horizontally so the acorns are on the right side toward the open end of the log. Resize so the ends almost meet up. It can stick outside of the log a little. Add a drop shadow.
Move ele59 so it sits on the log. I moved it so it was sitting on one of the edges. Resize so its size is appropriate to the tree log. Add a drop shadow.
Move ele100 directly behind the tube just above her shoes. Resize it so it's just in front of her. Add a drop shadow.
Move ele01 in front of the log and ele104. Have the paws meet the end of the right side of the log and the tail end of the wolf overlap the tube's right show. The wolf's head should stick out just above the grass hill in the background. Add a drop shadow.
Move ele71 in front of the wolf. Make it flush with the wolf. Add a drop shadow.
Move ele72 to the top right hand corner of the frame. Resize it and add a drop shadow.
Now would be a good time to save your work as .psd if you haven't already.
Now it's time for the mask.
Open a new canvas, size 600x600.
Open the mask and make sure it's 600x600 as well.
Open p07 and resize to 600x600.
Move p07 on to the blank canvas and then move the mask on top.
Remove the white background and then move it behind the frame. Make sure it is the very bottom layer. Resize as you like. I had little bits sticking outside the frame except the bottom.
Let's work on the name now.
Again, the font is Native Alien.
The color is #8c5431
Add a stroke of 2, color #2d0807
Add a white bevel to it as well, settings are below.
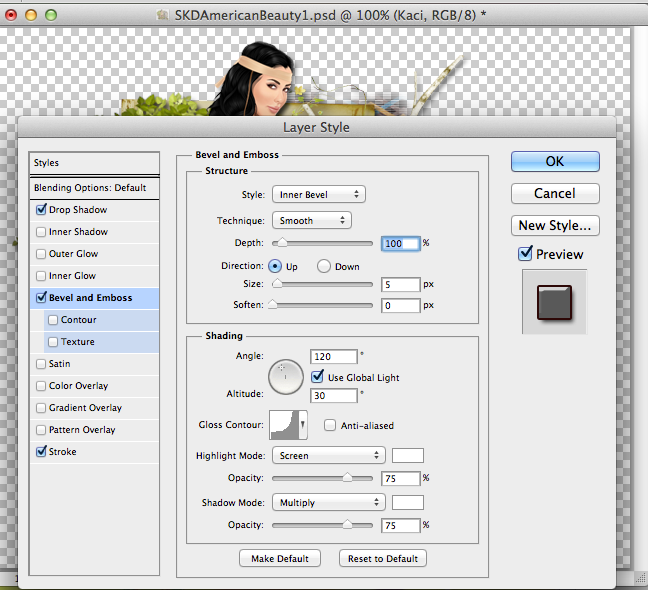
Add your copyright information and tagger mark.
Crop off any extra parts of the canvas. Make sure you do not cut off parts of the tag.
Save as .psd and .png.
Congrats your done! This kit is a must have! There are so many possibilities and it's so beautiful. I know you'll enjoy it as much as I did.
