
**This tutorial was written by me and any resemblance is purely coincidental. It is for those with a working knowledge of Photoshop**
Tools
Font
Bira
You can download it from dafont.com
Tube
"Style Life" by Arthur Crowe
You can purchase the tube here.
*You must obtain a license number to use it.*
Elements
ele14
ele19
ele23
ele25
ele26
ele27
ele28
ele36
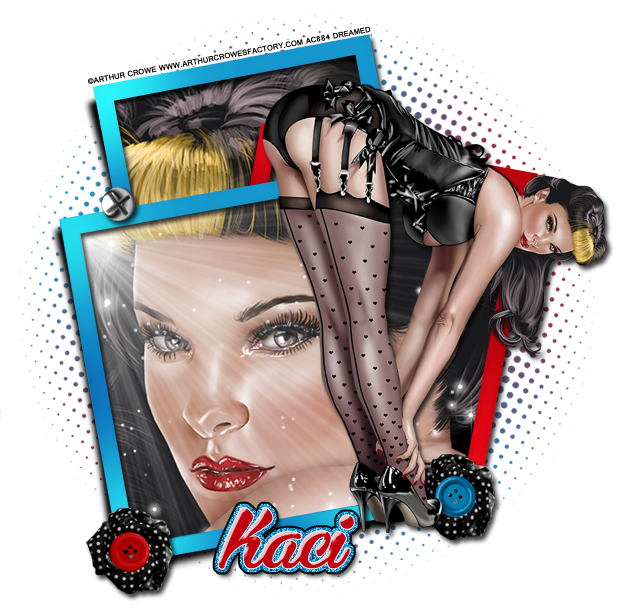
This is a simple tutorial with a fun Rockabilly kit and a new tube by Arthur Crowe. I hope you have fun with it, I did!
Let's start out by opening a new, blank canvas. Make it 650x650.
Move ele36 onto the canvas. It already has a shadow, but you can add more if you like.
Make a new layer and fill it with black. Move it behind the frame and size so nothing black sticks outside the frame. This will be the background for the frame.
Move ele25 behind the frame background. This will play as your mask. Size to fit and make sure nothing sticks off the edges of the canvas.
Move ele14 to the top left corner of the frame and flip horizontally. Resize and add a drop shadow.
Move ele23 to the bottom left hand corner of the frame. Resize and and add a drop shadow.
Duplicate ele23 and move it to the bottom right hand corner of the frame.
Move ele26 on to the first copy of ele23. Make it smaller so it's the center of the element. I didn't add a drop shadow, but you can if you like.
Move ele27 on to the duplicated ele23. Repeat the process as you did for ele26.
Move the AC tube on to the right side of the frame. Make sure it is the top layer so it is above the flower and button combo.
Resize the tube so her shoes meet the bottom of the frame and her head sticks out just a little over the red frame. Add a drop shadow to the tube.
I didn't use any filters this time to preserve the look of how she was intended. You can add filters if you like.
Move a new copy of the tube behind the frame but on top of the black background.
Flip her horizontally and make it so her face in mainly in the bottom blue frame with a little yellow hair showing. You should see the back of her neck in the red frame.
Move ele28 behind the frame but on top of the tube. Move the corner of the light to the top left hand corner of the frame in the front. Resize it so it looks as if it is coming from the corner of the frame. Erase any of the light that sticks outside the frame. To do this I add a new layer and fill it with 50% gray so I can see it easily.
Move ele19 on top of ele28 and adjust so it gives a little sparkle. Some can carry over to the red frame portion. Again, use the gray layer to erase anything sticking outside the frames.
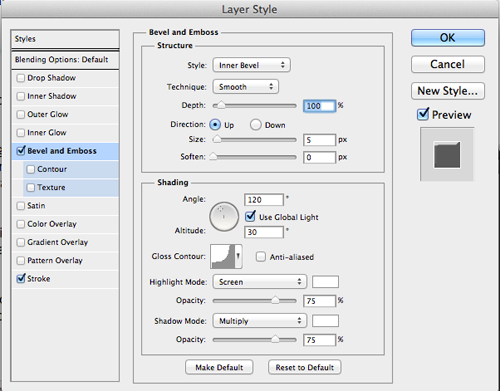
For the font I used Bira. The name is red, #c0020e, with a stroke size 1 in white. The bevel can be copied from the image below.
Now select the pixels of the name and expand by 4.
Fill it with blue, #1698ce, and Add Noise at around 18%. You can do more or less depending on your taste. Add a drop shadow and a black stroke, size 2.
Add your copyright information and tagger mark.
Crop off any extra parts of the canvas.
Save your .psd and save as .png.
Voila! We're done!
I love, love, love this kit and plan to play with it more so keep an eye out for more tags!
