

What you will need:
Font
Motion Picture
You can download it from FontSpace.
Mask
by Annaica' Place
You can download it from her blog here.
Tube
Summer is Coming by Alex Prihodko
You can buy it from PicsForDesign
*You must obtain a license to use this tube.*
Elements
Bike
Binoculars
Bird
Book
Cattails
Dock
Dried Flowers
Fence
Fish1
Fish2
FishingPole1
Flowers2
Ground
Key
Lake
Leaves2
PailofWater
PearlFlowers
Pitcher
Stone
Stool
Sun
TreeHorizon
Water2
Window1
WoodenHeart
Paper
P7
P12
Ready? Let's go to the Lake!
Open a new canvas, size 650x650.
Move Window1 on to the canvas. Add a drop shadow.
Now place the Dock behind the window toward the top. Add a drop shadow.
Place the Lake under the Dock so it covers a good portion of the opening in the window. Have it be taller than the dock and leave a little opening for the trees, sun, & sky.
Water2 will be the lake washing up on the docks. Resize so they are the appropriate size compared to the dock. Place two on the front part of the dock and then one on the back. The others should be blocked by other elements.
Move the tree horizon above the lake. Move it behind the lake and resize. Add a drop shadow. Erase any parts that stick outside the window.
Now add a new layer behind the window. Fill with a light blue for the color of the sky. I used the color code #cdeafb. Erase anything outside the frame.
Place the sun on top of the new "sky". Resize and place in the right corner. Erase any part of it that sticks outside the frame.
Move the ground in front and under the lake. Resize it and erase any parts outside the frame. Add another copy of the ground and place it on top of the other one. Erase any extra parts.
Move the Cattails on top of the ground. Have the Cattails stick a little over the dock. Add a drop shadow. Duplicate and move to the other side of the Window.
Now place the Fence in front of the Cattails. Resize so you can fit two. Add a drop shadow, duplicate and move to the other side.
Move Grass2 behind the Cattails and Fences. Use it to cover some of the empty space left over from the Fences and Cattails. Make it smaller than it originally is and add a drop shadow.
Place the Bike in front of the Fence on the left side. Resize so the handlebars just stick over the fence. Add a drop shadow.
Set the Bird on the Bike's seat. Resize the it's appropriate to the size of the Bike and add a drop shadow.
Move the PailofWater on the right side of the window in front of the Fence. Make it rather small. Add a drop shadow.
Place FishingPole1 on the right side of the PailofWater and lean it against the Pail. Resize and add a drop shadow.
You may need to zoom in for the next part. Take Fist 1 and rotate it so the tail fin is pointing up. Resize so it's relative to the size of the PailofWater. Erase the body where it sticks in front of the Pail. Stop erasing where the fish fits the rim of the Pail. Do not add a drop shadow. Repeat the same process for Fish 2.
Move the Stone in front of the fence on the right side of the middle of the Window. Resize it so it's the size of a small Stone. Add a drop shadow then duplicate it. Flip it horizontally and move it in front of the Stone so it overlaps a little. Now place the Flowers2 in the middle of the stones. Resize and add a drop shadow.
Now let's move in front of the window. Take the Ground again and move it in front of and under the Window so it sticks out in front of it.
Let's place the tube so we know what we have to work with. Resize her so she doesn't stick outside the Window too much. Add a drop shadow. For her shirt, I took the blue layer, gray scaled it, and then took the color from Flower2 to make it that color.
Take Leaves2 and rotate horizontally. Move on the right side of the Window behind the tube. Duplicate and flip horizontally and move to the other side of the Window.
Now place the DriedFlowers in front of the Leaves2 and lay horizontally like the leaves. Add a drop shadow. Erase parts of the DriedFlowers if you like so parts of the leaves stick out. Add another copy of the DriedFlowers and lay horizontally on the right side of the Leaves2. Repeat the erasing if you like.
Take the WoodenHeart and place it in front of the DriedFlowers & Leaves2. Resize and add a drop shadow. Place the Key on the WoodenHeart. Rotate so the bow part is on the upper right side of the heart and add a drop shadow.
Move the Stool behind the Tube. Resize so it's not standing over her. Add a drop shadow.
Place the Pitcher on the Stool and add a drop shadow. Resize.
Move the PearlFlowers on to the Pitcher. Resize so they do not stick outside it. Do not add a drop shadow.
Now place the book in front of the tube between her arm and legs. Resize and add a drop shadow.
Place the Binoculars on top of the book, resize, and add a drop shadow.
Let's make the mask. Open the mask by Annaica's Place. It comes black so you will have to invert it to make it white. Open a new canvas, size 600x600 and fill black. Move the mask on to the black and be sure not to have any parts hanging off. Now merge the layers together.
Open a new blank canvas, size 600x600. Open P12 and resize to 600x600 then move it on to the canvas and then the mask on top of the paper. Now remove the white background. Then place behind the tag and rotate so it's even with the angle of the window. Just have little parts hanging outside the frame.
Let's do the name now. The font is Motion Picture. Open P7 and resize to 300x300, this will fill the name. Type out the name and then move the resized paper over the name then create a clipping mask. After that is done then add the drop shadow. Next, add the stroke, size 3 and color #6d8a98. I added a bevel, Cove-Deep, and add a shadow with the color #a3cde1.
Add your tagger mark and copyright information somewhere on the tag so it is legible, but not easily removed.
Save as .psd & .png. We're done! I hope you enjoyed this tutorial :)
Stay tuned for a freebie from Lakeside Retreat as well!
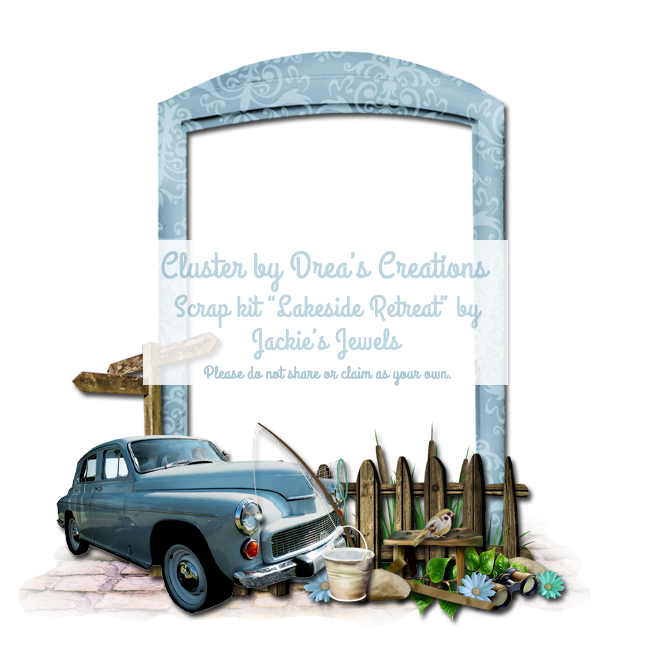
Click preview to download the cluster frame!
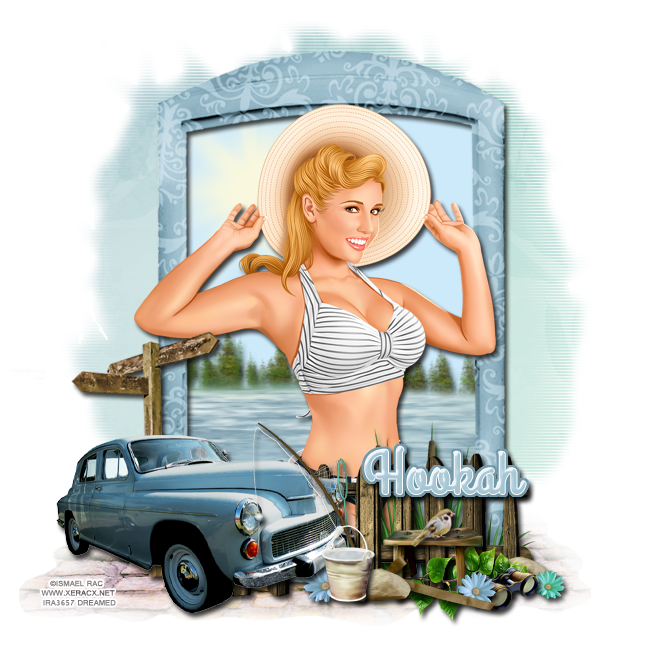
Here is the tag I made for Jackie with the cluster freebie I made :)
Leave some love when you download! Thanks for stopping by :)
