
What you will need:
Font
Dancing Script
You can find it on FontSpace.
Mask
WSL_Mask133
You can find it on weescotslass creations.
Tube
PinUp Toons 74-1
You can find it here.
**You must obtain a license in order to use this tube.**
Elements
Element7
Element11
Element14
Element16
Element18
Element19
Element20
Element22
Element23
Element25
Element27
Element30
Element31
Element32
Element36
Element37
Element43
Element50
Element54
Papers
Paper2
Paper9
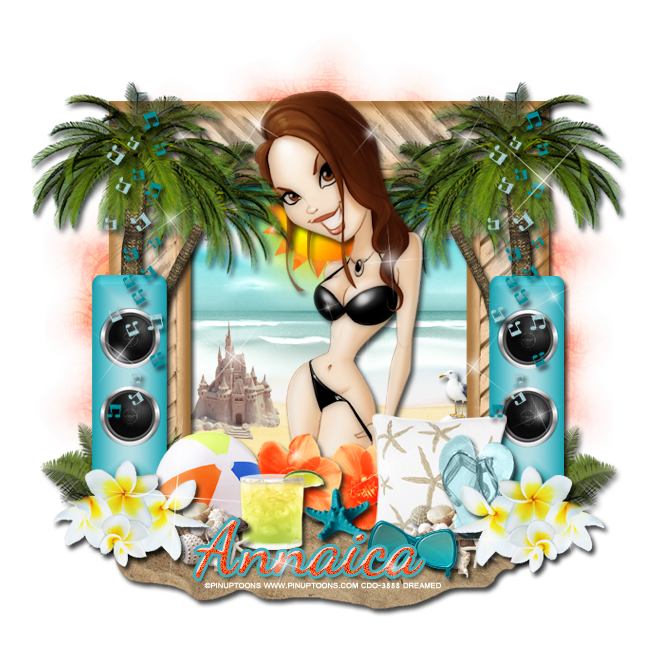
Ready? Good :)
Open a new canvas, size 650x650.
Move Element50 on to the canvas. Resize, leave enough room around the outside for the mask and trees to stick out, and add a drop shadow.
Place Paper2 behind the frame. Resize it so most of the paper is visible in the frame's opening. There should be no extras hanging outside the frame.
Place Element30 on the white rock on the paper background. Resize so the size of the seagull is appropriate and add a drop shadow.
Take Element23 and place it on the opposite side of the seagull, resize so it's small and looks off in the distance somewhat, and flip horizontally. No need to add a drop shadow.
Move Element43 behind the tube's head. Don't make it too large. You can add the glow if you like or just leave it as is. What I did is this: Select the pixels of the sun and expand by 3. Then add a blank layer below the sun's layer and add the color of the glow you would like. I used #ffdb00. Make sure you have this layer selected and go to Filter > Blur > Gaussian Blur. Mine is at 15.4 pixels.
Now take Element11 and place is on the left side of the frame. Resize so it's not too large. I have mine stick out over the frame just a tad and a little taller than the middle of the frame with the base meeting the bottom of the frame. Add a drop shadow. Duplicate and mirror it on the other side of the frame.
Move Element14 on top of the blue speakers. Start on the left side. Resize the music notes so they meet the bottom speaker and reach to the top of the frame. Duplicate and mirror on the other speaker. Add a drop shadow to both.
Place Element32 behind the speaker and music notes. Flip Horizontally so it looks like the tree is leaning toward the middle of the frame. You will need to resize it so they tree doesn't hang off the canvas. Add a drop shadow and mirror on the other side.
Move Element31 behind the speaker on the left. Have it about as tall as the bottom speaker. Add a drop shadow, duplicate and flip horizontally, and move it behind the other speaker.
Take Element36 and place it in front of the speaker on the left. Resize so just a little sticks out over the side. Add a drop shadow, duplicate, flip horizontally, and move in front of the other speakers.
Let's place the tube. I prefer to have the tube in front of the frame so you can either erase parts of the tube that stick over the frame on the bottom or just cover it up. Have her head stick out just a tad over the top, add a drop shadow.
Place Element19 behind the white and yellow plumerias in front of the speaker on the left. Flip the beach ball horizontally and resize so it doesn't stick over the frame too much. Add a drop shadow.
Move Element25 in front of the beach ball but behind the plumerias. Resize so they are smaller than the plumerias and add a drop shadow. Duplicate the cluster of shells, flip horizontally, and place behind the plumerias on the right side too.
Place Element7 behind the cluster of seashells on the left and move it so just a little of the drink overlaps the beach ball. Add a drop shadow.
Take Element18 and place it in front of the speakers on the right. The pillow should meet the bottom of the seagull and overlap the tube just a little. Add a drop shadow to the pillow.
Move Element20 in front of the pillow and behind the plumerias. The flip flops should sit on the cluster of seashells too. Resize so they are smaller than the pillow. Add a drop shadow.
Place Element16 in front of the cluster of seashells on the right. Add a drop shadow, resize.
Move Element37 on a layer just above the frame so it is behind everything. Rotate it so you don't see any openings on the flower. Resize so it just sticks out over the tube a little. Add a drop shadow. Duplicate the flower and flip horizontally. Move the duplicate right next to the other one and fill empty space. Rotate the flower so it's not an exact copy.
Place Element27 in front of the orange flowers. Make it smaller than the flowers and have it cover the opening in the middle between the flowers. Add a drop shadow.
Now take Element22 and place it under everything. Flip it vertically and have the sides meet the middle of the cluster of plumerias on both sides. Add a drop shadow.
Move Element54 on top of everything. You will need to resize it. To make sure you don't have much hanging outside the tag add a 50% gray layer just about the white background. You can resize it so it covers the whole tag and won't need to erase anything.
Add a new layer below the sparkle layer you just made. Start the text tool and select Dancing Script. Use this color code #ff4d1b. Add a stroke, size 3, with this color #3cb1bd. Add a drop shadow and a bevel if you like. I did Cove-Deep with a white shadow. Add noise to the text. I did it about 11%.
Now open the mask, WSL_Mask133. Open a new canvas, size 600x600, and Paper9. Resize Paper9 to 600x600 also.
Place the paper on the new blank canvas and then the mask on top. Remove the white background then place behind the tag. You will have to stretch it out so be careful that the mask doesn't hang outside the canvas. I didn't have it stick out below the sand and just have a little hang out the top and the sides.
Add your copyright information and tagger mark. Unclick the white and gray backgrounds if you haven't already and save as a .psd and .png.
I hope you had fun with this tutorial! This kit is perfect for summer and you can do much more with it :) Thanks for stopping by!
