
**This tutorial was written by my and any resemblance is purely coincidental. It is written for those with a working knowledge of Photoshop.**
What you will need:
Tube:
Black Rose 2 by Alex Prihodko
You can find it at PicsForDesign.
*You must obtain a license to use this tube.*
Font:
Carpenter Script
You can find it here.
Mask:
Created by me for this tutorial.You can download here.
Elements
Barn
Bird
Birdhouse
Book
Bush
Clouds
Deer
Fence
Fern
Frame3
Grass1
Grass2
Grass4
Hummingbird
Leaves
Lemonade
OutdoorTable
Pillows
Tree1
Papers
P8
P9
Have everything? Let's get started!
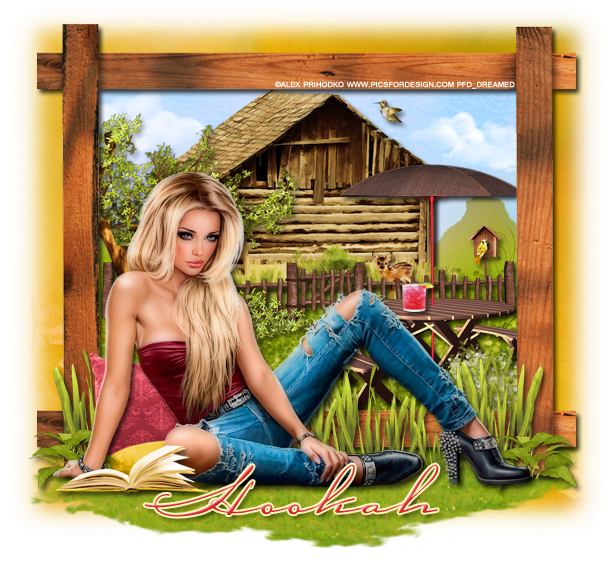
First, open a new canvas, size 650x650.
Move Frame3 on to the canvas. Resize it so you will have room for grass in the front and a mask behind it. Add a drop shadow.
Move P9 behind the frame. Resize so you can see most of it behind the frame. Erase the small extras on the sides and top.
Place the Barn so the top of the roof meets the frame and the bottom of the Barn sits toward the middle of the paper. Add a drop shadow.
Move the Fence in front of the Barn. Resize so the sides of the fence meet the inside sides of the frame and covers the bottom of the Barn. Add a drop shadow.
Place the Clouds around, but behind the Barn so you can see some on each side. No drop shadow necessary.
Move Tree1, flip horizontally first, and then behind the fence and in front of the Barn on the left side of the frame. Some of the Tree will cover part of the Barn. Have the Tree sit just under the top of the frame. Add a drop shadow.
Place the Hummingbird on the blue sky above and to the right of the Barn. Resize so it is fairly small. No drop shadow necessary.
Now take the Birdhouse and place it on the right side behind the fence. It should be small and just stand a little taller than the fence. Flip horizontally and add a drop shadow.
Place the Bird on the Birdhouse so it looks like it is perched on the open. Resize it and add a drop shadow.
Place the Deer behind the fence. Put it to the right of the Fence gate. Make it fairly small and add a drop shadow.
Now take the OutdoorTable and place it in the foreground of the picture on the right hand side. Have the top of the umbrella be a little taller the right angle of the Barn's roof. Add a drop shadow.
Move the Bush in front of the OutdoorTable, but inside the Frame so it covers the bottom right hand corner. Resize a little so it doesn't cover too much of the table and add a drop shadow.
Place the Lemonade on top of the OutdoorTable. You will need to make it small and add a drop shadow.
Move the Grass4 under the frame so it sticks out a little in the front. Leave enough room for your tube to sit on it. I did not add a drop shadow.
Place the tube on top of the grass in front of the frame. Resize her so she doesn't stick outside the frame. Add a drop shadow.
Take the Leaves and place it in front of the Fence and behind the tube. Use her as a guide to place it so not too much of the Leaves are covered. Place the Leaves to the left of the Fence gate under the out stretched branch of the tree. Resize so the top of the Leaves just sit under the top of the Fence and add a drop shadow.
Move Grass2 in front of the frame and behind the tube. Place it so the left side of the Grass2 meets the vertical edge of the frame on the left. Resize so it doesn't stand too high and meets the bottom of the frame. Add a drop shadow, duplicate, and flip horizontally. Move to the other side of the frame in the same place.
Place Grass1 next to the Grass2 on the right. Make it even and add a drop shadow.
Move the Pillows behind the tube. Have the red pillow meet the middle of her back and hide the blue pillow behind her. Add a drop shadow.
Place the Fern on the left side in front of the Pillows. Make it about half as tall as the Grass. Add a drop shadow, duplicate, and flip horizontally. Move to the other side behind the tube.
Move the book in front of the tube. Resize and add a drop shadow.
Let's make the mask. Open a new canvas, size 600x600. Open P8 and resize to 600x600. Open DC_Mask24. Move the P9 on to the new blank canvas and then the mask on top. Remove the white background.
Move the mask behind the frame. Have the mask stick outside the frame. Make it almost even with the other edges of the frame.
Now for the name. Again the font is Carpenter Script. The color of the name is the red from the color palette. Use color code #dc293c. Use a stroke, size 2 and the color code #fff8bc. Add a drop shadow and a bevel. I used the default Bevel with a shadow in the color #ebbc24.
Add your tagger mark and copyright information. Place it somewhere legible on the tag so it cannot be easily removed.
Crop off any extras, but do not cut off any part of the tag.
Save as a .psd and .png.
I hope you enjoyed this tutorial! This kit is awesome and I know you'll enjoy making many tags with it. Stay tuned for freebies below!

Here is a tag I made for Jackie using the cluster frame I made! I used the beautiful artwork of Zlata_M.

Thanks for stopping by :) Please leave some love when you download, thanks!
