
*Coming Soon!*
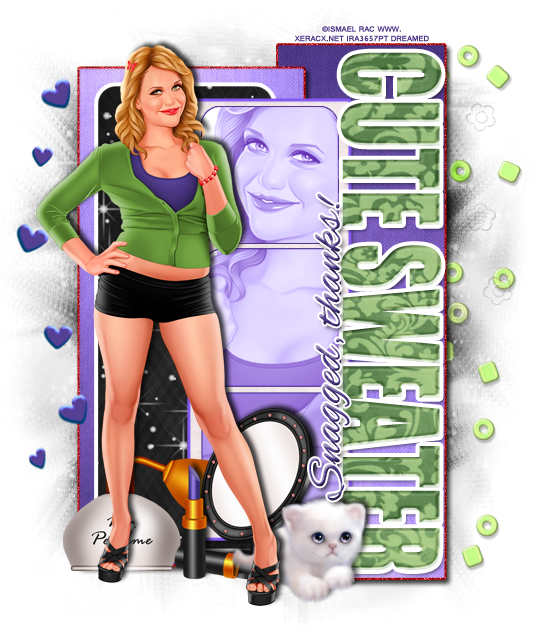
PTU tutorial using 2013 Cute Sweater by Ismael Rac!
Matching kit made by Irish Princess Designs!
You can purchase them both here!

**This tutorial was written by me and any resemblance is purely coincidental. It is written for those with a working knowledge of Photoshop.**
Supplies
Font
Mask
Scrap Kit
Template
Tube
*You must obtain a license to use this tube.*
Elements
Hearts
Kitty
Lipstick
Mirror
Perfume
Scatter
Papers
1
3
8
9
Let's start!
Open a new canvas, size 650x650.
Open the template and select all layers. Move it on to the canvas and resize, if necessary.
Remove layers 7, 8, and Raster 1.
Place the wordart, Cute Sweater, where Christmas. Instructions are below.
Place the tube in front of the template and to the left a little. Resize and add a drop shadow.
Take another copy of the tube and flip her horizontally. Place her over layer 5, create a clipping mask, and resize. Change her to Luminosity and drop the fill to 39%.
Select the pixels of layer 5 and fill with white. Add a stroke, size 1, in #503a8c.
Duplicate layer 5, move above the tube layer and create a clipping mask to the bottom layer 5. Select the pixels then fill with #543e91. Change the purple layer to Vivid light.
Move paper 3 over layer 4 and create a clipping mask. Add a drop shadow and a stroke, size 3, in #845af1.
Place paper 8 over layer 3. Resize and create a clipping mask. Add a stroke, size 4, in white.
Place paper 9 over layer 2. Resize and create a clipping mask. Make sure the lighter end is at the top.
Select the pixels of layer 2 and expand by 2. Add a layer underneath and fill with #bc0605. Add a drop shadow and noise to the red layer.
Place paper 9 over layer 1 and flip vertically. Resize and create a clipping mask. Make sure the darker end is at the top.
Select the pixels of layer 1 and expand by 2. Add a layer underneath and fill with #bc0605. Add a drop shadow and noise to the red layer.


Thank you for coming by!

Open the template and select all layers. Move it on to the canvas and resize, if necessary.
Remove layers 7, 8, and Raster 1.
Place the wordart, Cute Sweater, where Christmas. Instructions are below.
Place the tube in front of the template and to the left a little. Resize and add a drop shadow.
Take another copy of the tube and flip her horizontally. Place her over layer 5, create a clipping mask, and resize. Change her to Luminosity and drop the fill to 39%.
Select the pixels of layer 5 and fill with white. Add a stroke, size 1, in #503a8c.
Duplicate layer 5, move above the tube layer and create a clipping mask to the bottom layer 5. Select the pixels then fill with #543e91. Change the purple layer to Vivid light.
Move paper 3 over layer 4 and create a clipping mask. Add a drop shadow and a stroke, size 3, in #845af1.
Place paper 8 over layer 3. Resize and create a clipping mask. Add a stroke, size 4, in white.
Place paper 9 over layer 2. Resize and create a clipping mask. Make sure the lighter end is at the top.
Select the pixels of layer 2 and expand by 2. Add a layer underneath and fill with #bc0605. Add a drop shadow and noise to the red layer.
Place paper 9 over layer 1 and flip vertically. Resize and create a clipping mask. Make sure the darker end is at the top.
Select the pixels of layer 1 and expand by 2. Add a layer underneath and fill with #bc0605. Add a drop shadow and noise to the red layer.
Use the hearts to create decoration on the left side of the template. Duplicate and erase until you achieve a similar look.
Use the scatter and place some of them on the right side of the template and behind it. Duplicate and erase a few times to achieve a similar look.
Behind the tube on the left, place the perfume. Resize and add a drop shadow.
To the right of the perfume, place the lipstick. Resize and add a drop shadow.
To the right and behind the lipstick, place the mirror. Resize and add a drop shadow.
To the right of the tube and mirror, place the kitty. Resize and add a drop shadow.
Name
Main color is #4a3783.
Add a stroke, size 2, in white.
Add a drop shadow.
Wordart
Font used is Impact
Add a stroke, size 4, in white.
Add a bevel. Change the Gloss Contour to Rolling Slope - Descending.
Fill the text "Cute Sweater" with #72a443.
Place paper 1 over the word art and change to Soft Light.
Mask
Open a new canvas, size 600x600.
Open paper 8 and resize to 600x600. Place on top of the canvas.
Open the mask and move on top of the paper.
Remove the white background and place the mask behind the tag.
Make it evenly stretched on all sides.
Add your tagger mark and copyright information.
Crop off any extra canvas.
Save as a .psd & .png.
Here are free snags!