PTU tutorial using 2013 Hot Baking by Ismael Rac!
Matching kit made by Kizzed By Kelz.
You can purchase them both here.
**This tutorial was written by me and any resemblance is purely coincidental. It is written for those with a working knowledge of Photoshop.**
Supplies
Font
Mask of choice.
Scrap Kit
Tube
*You must obtain a license to use this tube.*
Elements
bowl
cake pan
cake
chef hat
cupcake pan
cutting board
egg
flour
fridge
mixer
mixing bowl
rolling pin
spoon
stove
Papers
4
Let's start!
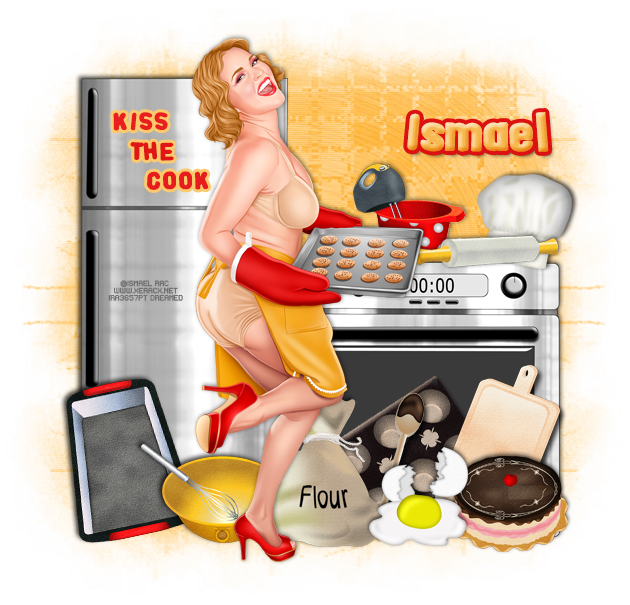
Open a new canvas, size 650x650.
Place the fridge on the canvas. Resize and add a drop shadow.
Place the stove next to the right of the fridge. Resize and add a drop shadow.
Place the tube in front of the appliances. Resize and add a drop shadow.
For the "Kiss The Cook" use #dc1111 for the main color and #f6b950 for the stroke, size 3.
On top of the stove, place the bowl. Resize and add a drop shadow.
Place the mixer "inside" the bowl. Resize and erase the mixers that stick outside the bowl so it appears to be sitting in the bowl. Add a drop shadow.
Behind the bowl and to the right, place the chef hat. Resize and add a drop shadow.
In front of the bowl and hat, place the rolling pin. Resize and add a drop shadow.
Starting from the left on the floor, place the cake pan. Resize and add a drop shadow.
Next to the cake pan, place the mixing bowl. Resize and add a drop shadow.
Place the flour next to the bowl and behind the tube. Resize and add a drop shadow.
Place the egg next to the bag of flour. Resize and add a drop shadow.
Behind the the flour and egg, place the cupcake pan. Resize and add a drop shadow.
Next to the egg, place the cake. Resize and add a drop shadow.
Behind the cake, place the cutting board. Resize and add a drop shadow.
In front of the cupcake pan, place the spoon. Resize and add a drop shadow.
Mask
Open a new canvas, size 600x600.
Open paper 4 and resize to 600x600. Place on top of the canvas.
Open the mask and move on top of the paper.
Remove the white background and place the mask behind the tag.
Make it evenly stretched on all sides.
Add your tagger mark and copyright information.
Crop off any extra canvas.
Save as a .psd & .png.
Free snags!
Thank you for coming by!