*Coming Soon!*
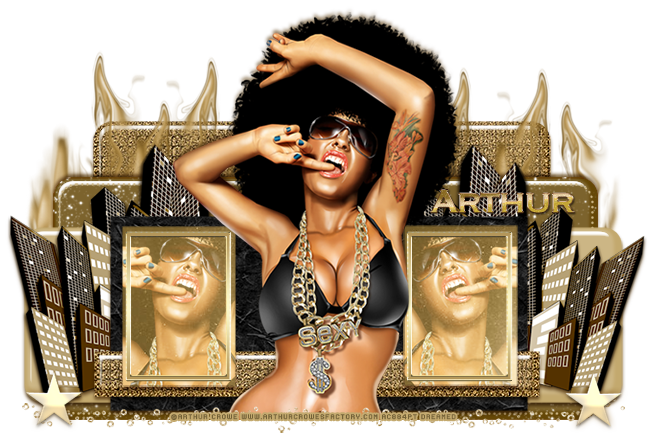
PTU tutorial using Sexy & Shine by Arthur Crowe and the matching kit made by Creation by Sanie!
Purchase them both here!
**This tutorial was written by me and any resemblance is purely coincidental. It is written for those with a working knowledge of Photoshop.**
Supplies
Font
Copperplate
Scrap Kit
Template
Tube
*You must obtain a license to use this tube.*
Elements
12
14
17
28
Papers
1
5
8
Let's start!
Open a new canvas, size 700x650.
Open the template and move on to the canvas and resize as needed.
Erase the raster layer as well and 5 & 6.
Place the tube in between layers 9 & 10. Resize and add a drop shadow.
Take a close up of the tube and place it over layer 9 and create a clipping mask. Duplicate the close up and flip horizontally. Move to layer 9.
Take paper 8 and place it over layer 9 and the tube. Create a clipping mask, resize, and change to screen. Repeat the same steps for layer 10. Add a drop shadow to both layers 9 & 10.
Add a gold color overlay to both layers 11 & 12.
Place paper 1 over layer 1 and create a clipping mask. Add a bevel and a drop shadow to layer 1.
In front of layer 1, place ele12. Place it on the left side of the tube then duplicate it. Move the duplicate to the right side of the tube. Erase the cut off edges of both fire copies with a soft brush.
Select the pixels of layer 2 and fill with #7e652f. Add a bevel and a drop shadow.
Add a color overlay with layer 3 using #cbb584.
Change the color of layer 4 to #cdb786. Add a drop shadow and a bevel.
Place paper 5 over layer 7 and create a clipping mask. Add a drop shadow.
Take paper 1 again and place it over layer 8 and create a clipping mask. Add a bevel and a drop shadow.
Between layers 4 & 7, place ele28 on the left side of the tube. Duplicate the cityscape and place on the right side of the tube. Make sure they don't stick off the template too much. Add a drop shadow to both.
Place ele14 along the front of the template and in front of the tube. Make sure it covers the full length. Erase anything that overlaps too much.
Move eles 13 & 14 down to the corners on the left and right. Add a gold color to the stars and add a drop shadow.
Add your tagger mark and copyright information.
Crop off any extra canvas.
Save as a .psd & .png.
Free snags!
Thank you for coming by!


