PTU tutorial using An Evening Of Romance by Jackie's Jewels!
You can purchase it at the Pimpin' PSPers Warehouse!
**This tutorial was written by me and any resemblance is purely coincidental. It is written for those with a working knowledge of Photoshop.**
Supplies
Font of choice.
Scrap Kit
Template
Tube
*You must obtain a license to use this tube.*
Elements
Bow
BoxofFlowers
Champagne
ChampagneBottle
Confetti
Gift
Letters
PinkSparkles
Rose1
RoseBunch
Papers
7
9
11
13
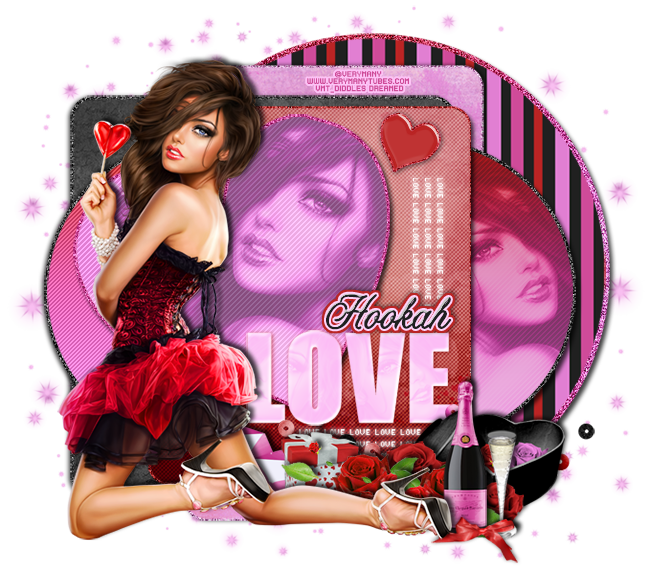
Let's start!
Open a new canvas, size 650x650.
Open the template and select all the layers. Place it on the canvas. Erase the raster layer.
Place paper 11 over layer 1. Create a clipping mask. Select the pixels of the circle and expand by 5.
Add a new layer below the circle and fill with white.
Open a new canvas, size 600x600. Add a gradient layer in these colors: #e17fd2, #cf4b99, and #ba2424. Flatten the image.
Place this over the white layer you just made. Create a clipping mask. Add noise.
Place paper 7 over layer 2. Create a clipping mask.
Select the pixels of layer 2 and expand by 2. Add a new layer below the layer and fill with #e17fd2. Add noise and a drop shadow.
Take the gradient paper you made earlier and place it over both layers 3 & 5. Create a clipping mask and move them around until you like where it is.
Select the pixels of layer 3 and expand by 3. Add a new layer below it and fill with #3a3a3a. Add noise and a drop shadow. Repeat the same steps for layer 5.
Place paper 9 over layer 4 and create a clipping mask. Select the pixels of layer 4 and expand by 3. Add a new layer below the layer and fill with #3a3a3a. Add noise and a drop shadow.
Place paper 13 over layer 6 and create a clipping mask. Select the pixels of layer 6 and expand by 3. Add a new layer below the layer and fill with #be2424. Add noise and a drop shadow.
Select the pixels of layer 7 and fill with #e07fd1. Select the pixels of layer 7 and expand by 3. Add a new layer below the layer and fill with #cf4b99. Add noise and a drop shadow.
Change the color of layers 8 & 9 to #be2424. Add a bevel in rolling slope-descending and change the shadow mode to white. Change the angle to -139 & the altitude to 32. Select the pixels of layers 8 & 9 and expand by 2. Add a new layer below the layer and fill with #be2424. Add noise and a drop shadow.
Change the color of layer 10 to #fed2fc. Add a bevel, Cone-Inverted, change the shadow mode to #fcd8f6. Add a drop shadow and change the color to #ba2424.
For layers 11 & 12, change to white and add an outer glow. Use the default glow, only change the color to white.
Place the tube in front of the template. Resize and add a drop shadow.
Take a close up of the tube and place it over layer 7. Create a clipping mask and change the tube to Luminosity. Drop the opacity to 50% and the fill to 80%.
Take another close up of the tube and place it over layer 3. Create a clipping mask and change the tube to Luminosity. Drop the opacity to 50% and the fill to 80%.
Behind the tube on the left, place the letters. Resize and add a drop shadow.
To the right of the letters, place the gift. Resize and add a drop shadow.
In front of the gift and to the right, place the rose bunch. Resize and add a drop shadow.
Duplicate the rose bunch and move it to the right of the first.
Place rose1 behind the rose bunches. Resize and add a drop shadow.
Behind the roses and to the right, place the box of flowers and flip horizontally. Resize and add a drop shadow.
In front of the box and behind the tube's shoe, place the champagne, champagne bottle, and bow1. Resize and add a drop shadow.
Behind the elements, place the confetti. Resize and duplicate.
Behind the template, place the pink sparkles around the outside. You will need to duplicate it a few times and move it around. Erase anything that sticks out too far or hangs off the canvas.
Name
Main color is black.
Add a stroke, size 2, in #fdd3f9.
Add a bevel, Cove-Deep. Change the shadow mode to white.
Select the pixels of the name and expand by 4.
Add a new layer below the name and fill with #ba2424.
Add a drop shadow.
Add your tagger mark and copyright information.
Crop off any blank canvas.
Save as a .psd & .png.
Free snags!
Thank you for coming by!