
PTU tutorial using Ana by Roman Zaric!
You can purchase the tube & matching kit HERE!

**This tutorial was written by me and any resemblance is purely coincidental. It is written for those with a working knowledge of Photoshop.**
Supplies
Font
Mask
(This is a mask I made.)
Scrap Kit
Template
(Look for the link under Week #3)
Tube
*You must obtain a license to use this tube.*
Elements
3
11
21
30
Papers
3
6
10
Let's start!
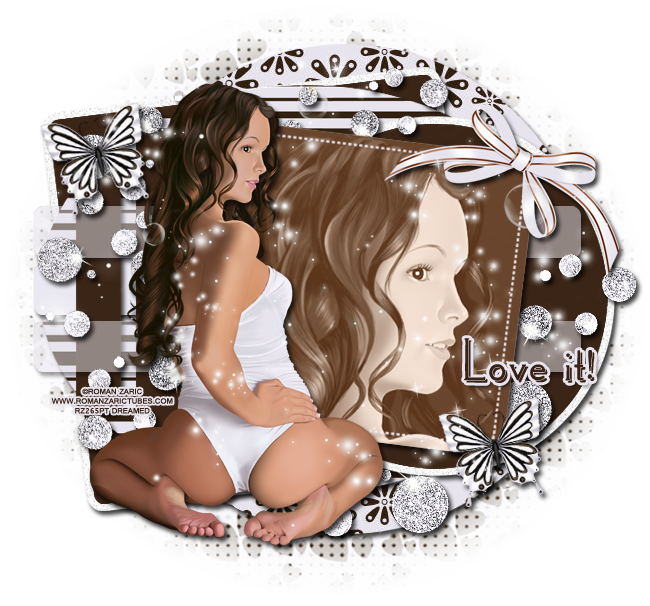
Open a new canvas, size 650x650.
Open the template.
Unclick the word art layers, raster 1, info, and bg.
Link the rest of the layers together and move them on to the canvas.
Move P10 over the grey circle and create a clipping mask. Add a drop shadow to the grey circle.
Add a drop shadow to the white square above the grey circle.
Select the pixels of the brown square and fill with #392416.
Add a drop shadow to the beige oval and move P3 over it and create a clipping mask.
Select the pixels of the middle grey strip and fill with #eae8f0. Add a drop shadow.
Select the pixels of the left brown strip and fill with #3b2517. Add a drop shadow.
Repeat the same steps as above for the right brown strip and the middle brown strip.
Add a drop shadow to the white circle.
Select the pixels of the brown circle and fill with #392416.
Select the pixels of the top grey strip and fill with ##eae8f0. Reduce the opacity to 50% and add a drop shadow.
Repeat the same steps for the bottom grey strip.
Select the pixels of the lgrey square and fill with #3b2517. Add a drop shadow.
Open a new canvas, size 400x400. Fill it with #3b2517. Move it over the lgrey square and create a clipping mask. Change it to Screen.
Place the full size tube on top of the template. Resize and add a drop shadow.
Take the larger size of the tube and move it over the lgrey square, under the "screen" layer. Create a clipping mask and resize so you can see the full size face of the tube.
With the dotted square layer, change the color overlay to #edeaf3.
Place element 3 on top of the template on the upper right hand corner. Resize a little and add a drop shadow.
Move element 11 on top of the template in the upper left hand corner. Resize and add a drop shadow.
Duplicate the butterfly and move it to the lower right hand corner.
Move element 21 on top of everything, including the tube, and rotate it 90° CW. Erase anything that hangs off the template or covers the tube's face.
Move element 30 behind the lgrey square. Use a few copies to spread it around the template. Add a drop shadow to each layer.
Mask
Open a new canvas, size 600x600.
Move paper 6 on to the blank canvas.
Open the mask and move on top of the paper.
Remove the white background and place the mask behind the tag.
Make it evenly stretched on all sides, but not hang off the canvas.
Name
Main color is #372215
Add a stroke, size 3, in #e7e4ed.
Add a drop shadow.
Add your tagger mark and copyright information.
Crop off any extra canvas.
Save as a .psd & .png.
We're done :)
Here are a few snags for you!


Thank you for coming by!
