
PTU tutorial using a gorgeous kit by Jackie's Jewels called Autumn's Evening!
You can purchase the kit at the Pimpin' PSPers Warehouse!
**This tutorial was written by me and any resemblance is purely coincidental. It is written for those with a working knowledge of Photoshop.**
Supplies
Font
Scrap Kit
Tube
*You must obtain a license to use this tube.*
Elements
Acorns
Apples
Berries1
Berries2
Books
Bottle
Branch
Butterfly
Crates
Fence
Flowers1
Flowers2
Frame3
Gourd
Lamp
LeafBundle
PineCone
Rabbit
Starlight
Papers
11
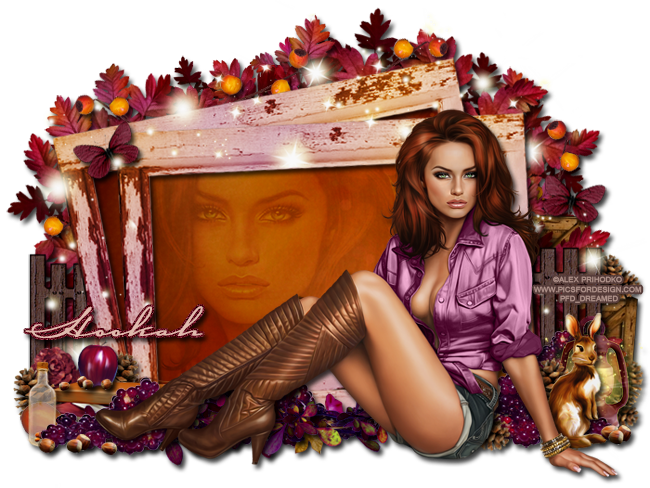
Let's start!
Open a new canvas, size 650x650.
Place Frame3 on the canvas and rotate 90° CW.
Duplicate Frame3 and move it behind and to the left of the frame.
Merge the frames and add a drop shadow.
Place Paper11 behind the frame and erase anything outside them.
Move the tube in front of the frame. Resize and add a drop shadow.
Take another copy of the tube and place it on the paper behind the frame. Flip it horizontally and create a clipping mask. Resize so she covers most of the open space, but isn't too large. Change her to Soft Light and reduce the Opacity to 50%.
Place the Fence behind the frame. Resize and move it to the right. Add a drop shadow. Duplicate the fence and put it on the other side of the frame. Make sure it stays the same level as the right side.
Move the Crates behind the fence and frame on the right side. Flip horizontally and resize. Add a drop shadow.
Behind the frame you will use the LeafBundle to create a "mask". I used quite a few copies of the LeafBundle and just resized, flipped, and rotated until it looked right. Add a drop shadow to each layer.
Now use Berries1 between the frame and the LeafBundle. Use one copy on each side of the frame and then three copies at the top of the frame. Just show one or two berries in each spot. Make the small and add a drop shadow to each layer.
Place a copy of Starlight on top of the frame on the left side. Cover the frame and above. Erase anything that is on top of the paper and close up of the tube. Add another copy and resize as needed to have some of the Starlight around the frame and leaves.
In front of the frame but behind the tube on the right side, place the Lamp. Resize and add a light drop shadow.
Place the Rabbit in front of the Lamp. Resize and add drop shadow.
Move the acorns in front of the lamp and rabbit. Resize so they are rather small and add a drop shadow.
Move the Pinecone behind the lamp. Have one laying horizontally and then duplicate it and rotate it up to the left a little.
Take a larger copy of the pinecone and place it behind the rabbit and between the lamp. Have it vertical, resize, and add a drop shadow.
Move the Berries2 behind the Lamp. Resize and add drop shadow.
Duplicate the berries2 and move it behind the tube and in front of the frame.
Move another copy of the pinecone between the tube and the berries. Make it smaller and add a drop shadow.
Place the Branch horizontally along the bottom the frame behind the tube. Resize a little and add a drop shadow. Duplicate the branch until the frame is almost hidden.
Place Flowers2 in between the Branch copies. Erase anything that sticks out. Add a drop shadow.
Move the Books behind the tube's feet on the left side. Resize and add drop shadow.
Set the apple on top of the books. Resize and add drop shadow.
Place another copy of the acorns in front the apple and set on the book. Make them rather small and add a drop shadow.
Place the Gourd in front of the books. Lay it horizontally, resize, and add a drop shadow.
In front of the gourd, place berries2. Add another layer and cover the space behind the boots.
Between the gourd and the berries, place the Bottle. Rotate so it stands up straight and add a light drop shadow.
Duplicate the acorns from in front of the apple and move them in front of the berries.
Place Flowers1 between the fence and books. Flip horizontally, resize, and add a drop shadow.
Add a couple of pinecones around the books. Resize and add drop shadow.
Place a Butterfly over the left hand corners of the frames. Resize and add drop shadow.
Duplicate the Butterfly and place the copy on the right side of the frame above the crates and on top of the leaves. Rotate it to the right a little.
Name
Main color is #e0baae.
Select the pixels of the name and expand by 2.
Make a new layer below the name and fill it with #630b1e.
Add noise at 12% and add a drop shadow.
Add your tagger mark and copyright information.
Crop off any extra canvas.
Save as a .psd & .png.
We're done :)
I made you a cluster frame from the tag I made above:

You can download it HERE!
Please leave some love when you download :)
Here are two free snags for you too!


Thank you for coming by!
