PTU tutorial using A Day of Harvest by Jackie's Jewels!
You can purchase it at Pimpin' PSPers Warehouse!

**This tutorial was written by me and any resemblance is purely coincidental. It is written for those with a working knowledge of Photoshop.**
Supplies
Font of choice.
Scrap Kit
Tube
*You must obtain a license to use this tube.*
Elements
Apples
BasketofShrooms
Branch2
Fence
Grass1
Hay
Mushrooms
Pail
Pinecone1
PumpkinBin
Pumpkins
ScatteredLeaves
Sign
Squash
Tomatoes
Veggies
WagonWheel
Papers
7
Let's start!
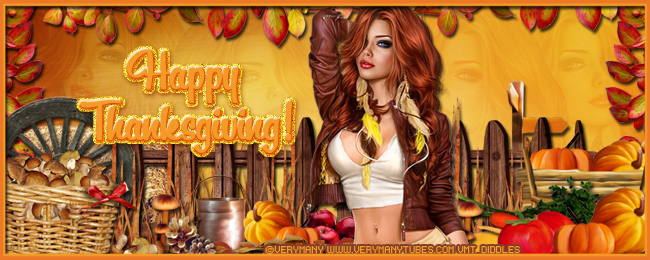
Open a new canvas, size 650x260.
Make two borders. The outside frame is #ec7825.
The inside frame is #f49b25. Add a drop shadow.
Place paper 7 behind the frame.
Place the tube behind the frames and on top of the paper. Resize and add a drop shadow.
Take the close up of the tube and place two copies on both sides of the tube.
Change each one to soft light and drop the fill to 40%.
Use branch2 to go around the banner. Duplicate and flip branch 2 until it's covered. Add a drop shadow to all of them.
On the right side of the tube, place the pumpkin bin in the right corner. Resize and add a drop shadow.
In front of the bin, place the veggies. Resize and add a drop shadow.
In front of the veggies, place the tomatoes and the pumpkins. Resize and add a drop shadow to both.
Have the squash sticking out behind the veggies. Resize and add a drop shadow.
To the left of the squash, place mushrooms 2. Resize and add a drop shadow.
Behind the elements just placed, place the fence behind them and the tube. Resize and add a drop shadow.
Behind the fence on the right, place the sign. Resize and add a drop shadow.
On top of the fence, place grass 1. Resize and add a drop shadow.
Place the basket of shrooms in the left hand corner. Resize and add a drop shadow.
Move the wagon wheel behind the basket. Resize and add a drop shadow.
Duplicate the fence from earlier and move it to the left side of the tube.
Place the hay behind the fence.
Duplicate the grass from before and place it along the fence. Duplicate and flip once or twice more.
Directly to the left of the tube, place the apples. Resize and add a drop shadow.
Place the pumpkins next to the apples. Resize and add a drop shadow.
Place the scattered leaves in front of the pumpkins. Resize and add a drop shadow.
Place the pail to the left of the pumpkins. Resize and add a drop shadow.
Place pinecone1 in front of the pail. Resize and add a drop shadow.
Place mushrooms2 behind the pinecones and to the left a little. Resize and add a drop shadow.
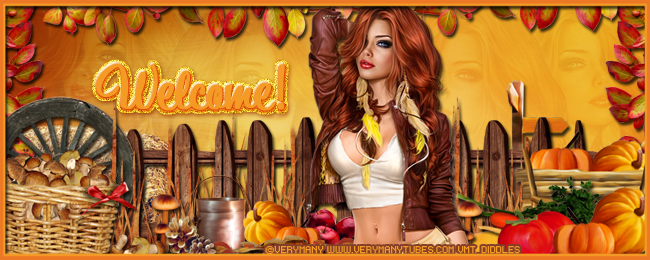
Name
The main color is #f49b25.
Add a default bevel and change to outer bevel.
Change the depth to 281, direction up, and size 3.
Add a stroke, size 1, in #ec7825.
Select the pixels of the name and expand by 4.
Add a layer below the name and fill with #f8c927. Add a drop shadow.
Add your tagger mark and copyright information.
Crop off any extra canvas.
Save as a .psd & .png.
Free snags!
Thank you for coming by!