PTU tutorial using Geek Chic by Karra's Kreative Korner!
You can purchase the kit HERE!
**This tutorial was written by me and any resemblance is purely coincidental. It is written for those with a working knowledge of Photoshop.**
Supplies
Font
Mask of choice.
Scrap Kit
Tube
*You must obtain a license to use this tube.*
Elements
atom 1
atom 2
backpack
banner
bead scatter
binder clip
book
books
bubblegum
calculator
cellphone
chalk
chalkboard
compact
composition notebook
data analysis
desk
flash drive
glitter dust
glue
lamp
laptop
lipstick
magnifying glass
notebook
pager
paperclip
pen
pencil
post-its
scissors
sign1
soda
tape1
videogame
Papers
7
Let's start!
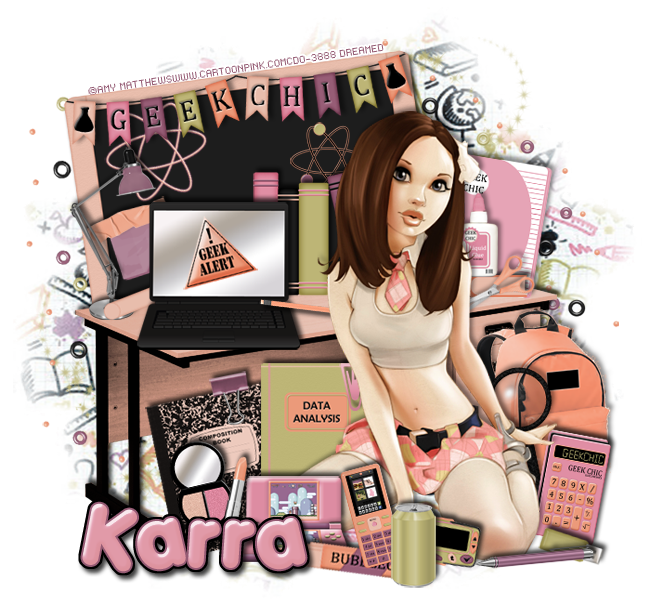
Open a new canvas, size 650x650.
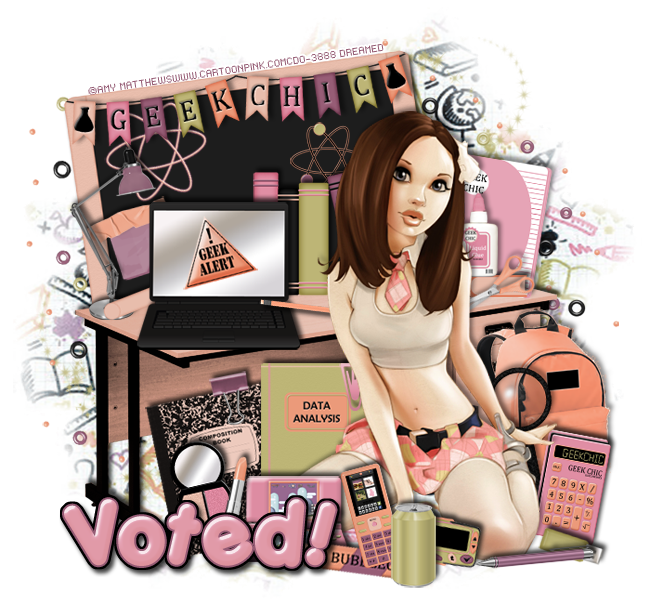
Move the desk on to the canvas. Resize and add a drop shadow.
Place the tube in front of the desk. Resize and add a drop shadow.
On top of the desk, place the lap top to the left of the tube. Resize and add a drop shadow.
Place sign1 on the laptop screen and resize.
Place the pencil on the laptop so a little rests on the desk behind the tube. Resize and add a drop shadow.
Place the lamp on the left hand corner in the back. Resize and add a drop shadow.
Rest the chalk on the bottom of the lamp. Resize and add a drop shadow.
Behind the laptop, place the books. Resize and add a drop shadow.
On the right side of the tube, place the book. Resize and add a drop shadow.
On top of the book, place the glue. Resize and add a drop shadow.
In front of the book, place the scissors. Resize and add a drop shadow.
Behind the book, place the notebook. Resize and add a drop shadow.
Behind the desk, place the chalkboard. Resize and add a drop shadow.
Place the banner at the top of the chalkboard. Resize and add a drop shadow.
Place both of the atoms on the chalkboard and resize.
Place the post-its behind the lamp and laptop on the chalkboard. Resize and add a drop shadow.
Place tape1 over the post-its. Resize and add a drop shadow.
In front of the tube, place the soda. Resize and add a drop shadow.
Behind the soda, place the gum, cell phone, and pager. Resize and add a drop shadow to each one.
Place the pen in front of the tube and a little to the right. Resize and add a drop shadow.
Place the flash drive behind the pen. Resize and add a drop shadow.
To the left of the tube, place the calculator. Resize and add a drop shadow.
Place the magnifying glass behind the calculator. Resize and add a drop shadow.
Move the backpack behind the magnifying glass. Resize and add a drop shadow.
To the left of the tube, place the video game between the bubblegum and tube. Resize and add a drop shadow.
Behind the tube and underneath the desk, place the data analysis notebook and then the composition notebook to the left of it.
Place the binder clip over the composition notebook and resize.
Place the paper clip over the data analysis notebook and resize.
On top of the composition notebook, place the compact and lipstick. Resize and add a drop shadow.
Place the bead scatter behind the tag on the left and right sides. Erase some that are sticking out too far.
Place the glitter dust behind the bead scatter on the right side and resize.
Duplicate the glitter dust on the lower left hand corner behind the desk and resize.
Name
Main color is #e6a4b6.
Add a stroke, size 2, in #955b74 and add a drop shadow.
Add the bevel, change to Cove Deep and change the shadow mode to #e3b2a0.
Select the pixels of the name and expand by 4. Add a layer below and fill with black. Add a drop shadow.
Mask
Open a new canvas, size 600x600.
Open paper 7 and resize to 600x600. Place on top of the canvas.
Open the mask and move on top of the paper.
Remove the white background and place the mask behind the tag.
Make it evenly stretched on all sides.
Add your tagger mark and copyright information.
Crop off any extra canvas.
Save as a .psd & .png.
Free snags!
Thank you for coming by!