
**This tutorial was written by me and any resemblance is purely coincidental. It is written for those with a working knowledge of Photoshop.**
Font
Parisienne
You can find it on FontSpace.
Mask
WSL_Mask248
You can download it from Weescottslass Creations.
Tube
Devil's Bride 2 by Alex Prihdko
You can purchase it from PicsForDesign.
*You must obtain a license to use this tube.*
Elements
Candle
Fence2
Flower
Frame2 (In the frame folder)
Grass
HolyWater
Lightning
Mask
Moon3
Plant
Rose
Smoke
Sparkle
Tombstone
Tree2
Tree3
Papers
9
10
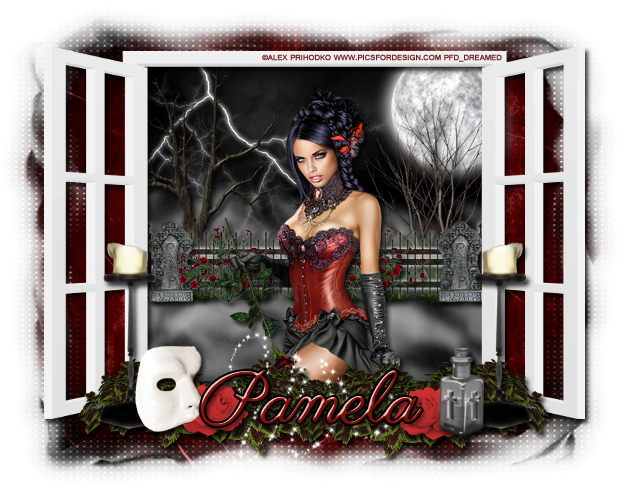
Have everything? Let's get started :)
Open a new canvas, size 650x650.
Move Frame2 on to the canvas and resize as you like. Add a drop shadow.
Move Paper8 behind the frame and resize. Erase any extras hanging outside the frame.
Place Fence2 about midway on the paper. Resize a little and add an outer glow in white with a spread of zero and a size of 5. Also add a drop shadow.
Take the Grass, place it behind the fence, and resize so it's similar to the size of the fence. Duplicate the grass until you cover the back of the fence.
Place the Flowers in front of the fence on the left. Resize so it's about as tall as the fence and add a drop shadow. Duplicate once and move to the other side of the fence.
Move the tombstone to the left edge of the frame. Resize it so it's a little taller than the fence and add a drop shadow. Duplicate it and move it to the other side of the frame.
Move Tree 2 behind the Fence & Grass on the right side and resize. Add a drop shadow.
Move Tree3 behind the Fence & Grass on the left side and resize. Add a drop shadow.
Place the Lightning in the upper left hand corner of the frame and place it on top of the paper background so it is behind everything. Resize and add an outer glow in white with a size of zero and a spread of 5.
Move Moon3 in the upper right hand corner and place it just above the paper so it is behind everything. Resize it and have a little hidden behind the corner of the frame. Add an outer glow with a size of zero and a spread of 21. Erase any parts of the moon sticking outside the frame.
Move the Smoke behind the Fence and Grass. You can have in front of the trees. Resize a little if you like. Make sure a little sticks over the fence and it fully covers the space below the fence and flowers. Erase any smoke hanging outside the frame.
Now let's move in front of the frame. Place the Candle in front of the right side of the frame. Resize so it just stands taller than the lower section of the window. Add a drop shadow. Duplicate the candle, flip horizontally, and move to the other side of the window.
Place the Plant behind the Candle on the right side. Rotate a little so it seems more horizontal than at an angle. Resize and add a drop shadow. Duplicate, flip horizontally, and move to the opposite side. Do this two more times flipping the horizontal direction until you cover the front of the frame.
Move the HolyWater in front of the plants and candle on the right side. Resize a little and add a drop shadow.
Move the Mask in front of the candle and plants on the left side. Resize and add a drop shadow.
Place the Rose behind the HolyWater on the right side, but in front of the plants. Resize and add a drop shadow. Duplicate the rose and place it behind the mask on the left side.
Take the Sparkle and move it in the middle of the roses. Rotate so it looks horizontal. Resize a little and erase little parts so it looks intertwined in the roses.
Let's make the mask.
Open a new canvas, size 600x600.
Open WSL_Mask248.
Open Paper10 and resize to 600x600.
Move the paper on to the canvas and then the mask on top. Remove the white background.
Move the new mask behind the frame and resize so it sticks out evenly on all four sides.
For the name:
Again the font is P22 Cezanne Regular (similar to the Phantom of the Opera original font).
Fill it with this color: #a81b12.
Add a drop shadow.
Add a bevel in Cove-Deep with a shadow of black.
Add a black stroke, size 2.
Finishing Touches
Add your copyright information & tagger mark.
Crop the tag being careful not to cut off any parts of the tag.
Save as .psd & .png.
I had fun with this kit! I hope you enjoy the tut. Thanks for stopping by :)
