
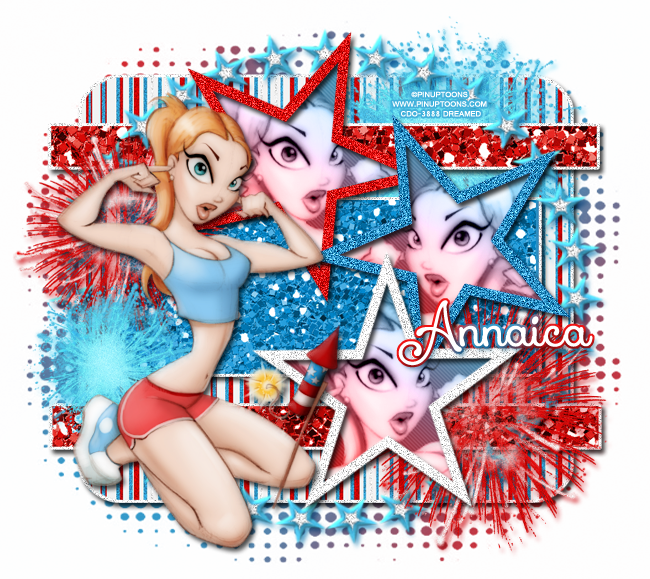
I have a new PTU tutorial using Firecracker, a fun new kit by Annaica's Place. It was perfectly matched by Pin Up Toons.
**This tutorial was written by me and any resemblance is purely coincidental. It is written for those with a working knowledge of Photoshop.**
What you will need:
Filters
Xero Radiance
Xero Porcelain
Penta - Jeans
Font
Xiomara by Nymphont
Download at FontSpace.
Template
Born In The USA Template by Jackie's Jewels
Download it here.
Tube
Pin Up Toon 4-3
Buy it here.
*You must obtain a license in order to use this tube.*
Elements
3
4
39
Papers
1
8
10
Let's get started!
Open a new canvas size 650x650.
Open the Born In The USA template. Link all the layers except the credits, WA (wordart), and background.
Move the template over to the blank canvas. Resize so no parts of the template hang off the canvas. Make sure there is even space around the template so you have room for things to hang off the template.
Move Paper 1 on top of Layer 1 of the template. Resize the paper so it covers Layer 1 just a little. Creat a clipping mask. Now right click on Layer1 and Select Pixels, expand by 2. Add a new layer below it and fill with white. Add noise to the white layer at 20%. Repeat this step for each layer in the template except the stars.
Now with Layer 3 & 4, add Paper 10 to each layer. Resize the paper so it doesn't look too oversized and create a clipping mask. Do it for both layers.
For Layer 2, move Paper8 over it, resize, and create a clipping mask.
Now let's work on the stars. I used Paper2 for my colors.
For the red star, select the pixels and fill with the red on the paper. Add noise at 20%.
For the blue star, select the pixels and fill the darker blue on the paper. Add noise at 20%.
For the white star, add noise at 20%.
For the gray layer inside the stars I made a gradient layer with the red and blue from Paper2 at an angle. Place it over the white star's gray layer and create a clipping mask. Change the layer to Soft Light. Duplicate the gradient layer for the same star and again, change the layer to Soft Light. Link the two gradient layers together and duplicate. Move the duplicate copy to the blue star and duplicate again and move the layers to the red star.
Let's place the tube. Move the tube to the left side of the template and flip horizontally.
Now take the tube again and place in the white star and create a clipping mask to the gray part above the gradient layer. Change the blend mode to Luminosity. Rotate the tube a little so you don't cover too much of her face. Repeat the process for the other two stars.
Place Element 39 between Layer 5 & Layer 4. Resize so it meets the four sides of the background layer. Add a drop shadow in the color #1f84b8.
Now let's place the fireworks. Move Element 3 to the bottom right hand corner of the template. Place it behind the star but in front of the red horizontal bar. Add a drop shadow in the color #cc0a10. Duplicate and move behind the tube's head and make a little smaller.
Move Element 4 toward the top of the template and place it behind the start and between them. Add a drop shadow in the color #5cd8f7. Duplicate and move behind the tube and below the red one and make a little smaller.
Let's add the filters.
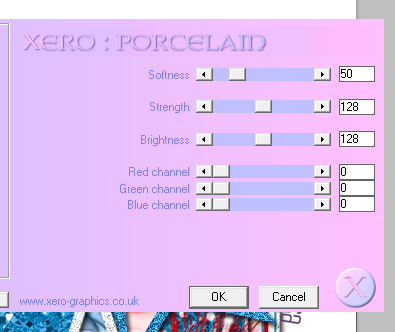
Add Xero Porcelain like below to the each layer of the tube.
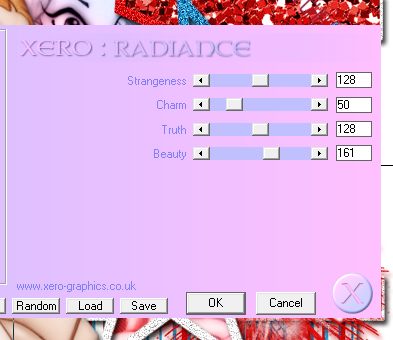
Add Xero Radiance to each tube in the stars like below.
Add Penta - Jeans to the gradient layer behind the tube like below.

Now for the mask I used the same gradient as the layer for the star.
The name is white. Select the pixels and expand by two. Fill the layer below the name with white and then add the gradient to it. Add a drop shadow to both layers.
Add your tagger mark and copyright information.
Crop off extras of the tag.
Thanks for stopping by and I hope you enjoyed :)
