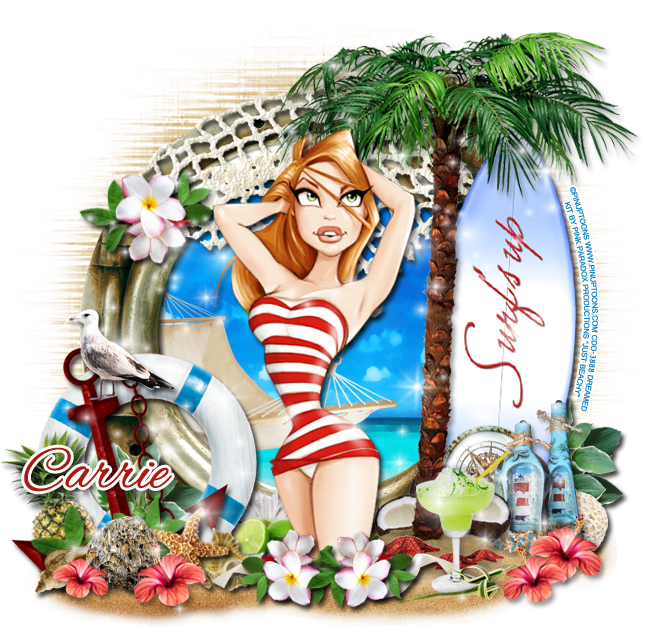
I have a new PTU Tutorial using a packed kit by Pink Paradox Productions called Just Beachy!
I matched it with the artwork of Pin Up Toons.
**This tutorial was written by me and any resemblance is purely coincidental. It is written for those with a working knowledge of Photoshop.**
Supplies
Font
Alex Brush by TypeSETit
Mask
WSL_Mask216 by Weescotslass Creations
Scrap Kit
Just Beachy by Pink Paradox Productions
You can buy it at PicsForDesign!
PPP kits are on sale for the month of July. Buy 3 get 1 FREE!
Tube
Tube 32-1 by Pin Up Toons
*You must obtain a license to use this tube.*
Elements
1
2
3
6
7
12
13
16
20
23
25
39
40
42
47
48
60
76
83
87
95
100
101
103
109
117
118
133
F3
Papers
2
3
Let's get started :)
Open a new canvas, size 650x650.
Move F3 (frame) on to the canvas. Resize and add a drop shadow.
Place P3 (paper) behind the frame. Resize and erase parts outside the frame.
Place the tube in front of the frame. Resize and add a drop shadow.
Move E100 to the right of the tube. Resize and add a drop shadow.
Place E40 next to the tree and a little behind it. Make it smaller than the tree. Add a drop shadow.
Place E118 underneath everything so it sits in front of the frame too.
Place E117 on top of the frame. Resize and rotate so it follows the curve of the frame. Add a drop shadow.
Move E60 behind the frame and on top of the paper and resize.
Place E23 on top of the frame on the left. Resize and add a drop shadow.
Place E39 on top of E23 and rotate. Resize and add a drop shadow.
Place E20 on top of E39. Resize and add a drop shadow.
Take E76 & E95 and lets place them on the netting on the frame. Place E76 on the end of it, rotate and resize. Move E96 behind the flowers and resize and rotate so the leaves stick out. Add a drop shadow to both.
Now link these two together and duplicate. Place two copies in front of the tube on the sand and resize.
Move E101 behind the surfboard on the right and behind the lifesaver. Resize and add a drop shadow.
In front of the lifesaver:
Place e47 on the left. Resize and add a drop shadow.
In front of the pineapple, place E13. Rotate, resize, and add a drop shadow.
Next to E13, place E17. Resize and add a drop shadow.
Move E12 next to E13. Rotate a little to the left. Resize and add a drop shadow.
Behind E12, place E16 then resize and add a drop shadow.
In front of the pineapple and behind the shells and starfish, place E95. Rotate, resize, and add a drop shadow.
Place E87 in front of E7 & E12. Flip horizontally then resize, and add a drop shadow.
Duplicate the flower and flip back. Move in front of E13 & E7. Make it smaller.
Behind the tube and between her and the lifesaver place E52. Resize and add a drop shadow.
Behind the lime, place E83 then rotate, resize, and add a drop shadow.
On the sand of the palm tree place E3. Flip horizontally then resize.
Place E42 in front of the palm tree and the cluster of starfish. Resize and add a drop shadow.
In front of the drink, place E103. Resize and add a drop shadow.
Behind the palm tree and the tube place two E48s. The one behind the tube and the tree make smaller. Make the second coconut smaller and flip horizontally, but larger than the other one. Add a drop shadow to both.
Take E1 & E2 and move them in front of the surf board, but behind the tree and coconuts. Move E1 next to the coconut. Resize and add a drop shadow. Move E2 next to and behind E1. Resize and add a drop shadow.
Behind the coconuts and bottles, place E25. Rotate, resize, and add a drop shadow.
Behind the bottles on the right, place E6. Rotate, resize, and add a drop shadow.
Take E87 again and place in front of the bottles and palm tree. Resize and add a drop shadow.
Duplicate, make smaller and flip horizontally. Add a drop shadow.
Behind the cluster of flowers in front of the tube, use E109 to have a little stick out both sides. Resize and erase parts of the bow that aren't necessary. Duplicate so it's on both sides. Add a drop shadow to both.
Now place E133 on top of the elements on the left side. Erase any parts that hang off the tag. Place another copy on the opposite side, flip horizontally. Erase any parts that hang off the tag.
Mask:
Open a new canvas, size 600x600.
Open WSL_Mask216.
Open P2 and resize to 600x600.
Place the mask on top of the canvas and then the paper.
Remove the white background.
Move behind the tag.
Stretch so it is even on both sides of the frame and be sure not to stretch it off the canvas.
Name:
Font is Alex Brush.
Main color: #ab1911.
Stroke, size 3, in white.
Now crop off any extra parts. Make sure not to cut any parts of the tag off.
Save as a .psd & .png.
Thanks for stopping by!
Thanks for stopping by!


