
I have a new PTU tutorial using 2013 LifeGuard by Ismael Rac and the matching kit!
Both are coming to his store very soon!! :)
**This tutorial was written by me and any resemblance is purely coincidental. It is written for those with a working knowledge of Photoshop.**
What you will need:
Font
by ByTheButterfly
Mask
Hana - Mask1
You can find it on Creative Misfits' Blog.
Scrap Kit
2013 Lifeguard by Ditzy Designs
Tube
2013 LifeGuard by Ismael Rac
Template
Halloween Template 1 Misfit by Jackie
You can find it on Creative Misfits' Blog.
Elements
Beachbag
Beachball 1
Flipflops 2
Flower 1
Kite
Pail 2
Palmtree 1
Rainbow
Sand 2
Seagull
Starfish
Sun 2
Sunglasses
Sunscreen 1
Surfboard 2
Towel
Waves 1
Papers
Paper 3
Alright, let's begin!
Open a new canvas, size 800x650.
Open your template. Select all layers, unclick the raster and word art, link together and move on to the blank canvas.
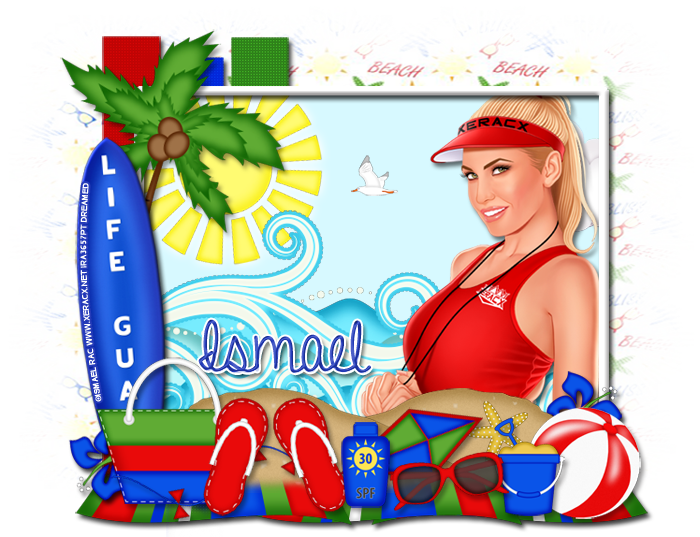
The three vertical bars in the back will be red, blue, and green from left to right in that order:
#c00404, #0328db, #2f821a
Make sure you change the color to the lower layer of each vertical bar and leave the overlay alone.
Add a drop shadow to each lower layer.
Frame around the main square:
Fill white
Add a drop shadow
Bevel: Leave everything as default, but change the shadow to #848282.
Main Square fill to this color #d7f8ff.
Place the tube behind the frame and create a clipping mask to the main square. Resize and move so she's not cut off too close to the face and her arm is just hiding behind the frame. Add a drop shadow #3b3a3a.
Move the Sun 2 in the upper left corner and resize. Rotate a little and add a glow: change the size to 12 and leave everything else the same.
Place the Waves 1 behind the frame at the bottom. Erase any parts outside the frame.
Move the Seagull to the right of the Sun. Resize so it's tiny.
Now take the Towel and place it under the frame to the right. Duplicate two more times so it covers below the frame. Add a drop shadow.
Place Sand 2 on top of the towels in front of the main square. Move one copy to the left side and resize. Duplicate and move to underneath the first copy so they are even. Merge the two layers together.
Use the small round eraser around 20px and soften the bottom of the sand.
Move the Surfboard 2 on the left side of the square and behind the sand. Rotate a little to the left and add a dropshadow.
Move the Palmtree 1 behind the surfboard and add a drop shadow.
Place Flower 1 behind the sand at the bottom and in front of the surfboard. Resize and rotate so it's pointing down. Add a drop shadow.
Duplicate the Flower 1 and move to the right side behind the sand, but this time move it to the top of the sand hill. Point this one toward the top.
Place the Beachbag in front of the surfboard and sand on the left. Resize and add a drop shadow. Make sure not to cover up the flower.
Move the Beachball 1 on the right side of the sand layer and in front. Resize and add a drop shadow. Make sure not to cover up the flower.
Place Pail 2 to the left of the beach ball so they overlap. Resize and add a drop shadow.
Place the Flipflops 2 to the right of the beachbag so they overlap very little. Resize and add a drop shadow.
Now place the Sunscreen 1 next to the flip flips so they overlap very little too. Resize and add a drop shadow.
Move the sunglasses between the sunscreen and pail. Resize so they touch just a little. Add a drop shadow.
Place the Starfish on to the sand hill behind the pail. Resize and rotate a little.
Move the Kite behind everything and on top of the sand. Resize and rotate so it's laying behind the elements on the sand. Add a drop shadow.
Let's make the mask:
Open a blank canvas, paper 3, and your mask and resize them all to 600x600.
Move the paper on to the canvas and then the paper.
Remove the white background then move behind the tag.
Resize so you can see it on all three sides (except the bottom, erase that part).
Make sure you do not stretch it off the canvas.
Crop off the extras around the tag and make sure not to cut off any parts of the tag.
For the name:
Font is A Gentle Touch.
Main color is #243cbc.
Stroke is white, size 3.
Bevel is Rolling Slope -Descending.
Add your tagger mark and copyright information.
Save as .psd & .png.
We're done! Thanks for coming by :)
