
I have a new PTU tutorial with the beautiful artwork of Tony Tzanoukakis called "Alleye" and the matching kit by Desirena Designs.
*Coming Soon!*

**This tutorial was written by me and any resemblance is purely coincidental. It is written for those with a working knowledge of Photoshop.**
What you will need:
Font
Mask
WSL_Mask 236
Scrap Kit
Alleye
Tube
Alleye by Tony Tzanoukakis
You can purchase it here.
*You must obtain a license to use this tube.*
Elements
3
4
5
9
10
22
26
29
Papers
P1
P12
Let's begin!
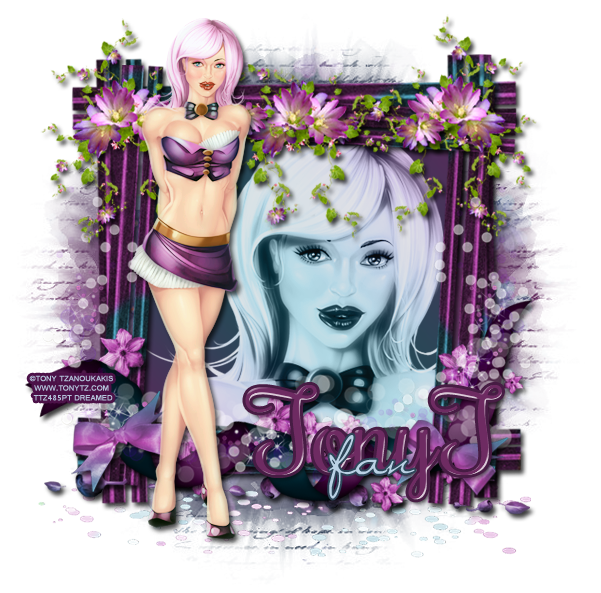
Open a new canvas, size 650x650.
Move element 22, frame, on to the canvas. You can rotate as I did or leave as is. Resize and add a drop shadow.
Place element 9 on the top left hand corner of the frame in front. Rotate so it follows the angle of the frame. Resize and add a drop shadow. Duplice and flip horizontally then move to the opposite corner.
Copy the layer again and place the large flower with the small flower on the right in the middle of the other two element 9s. Erase the part sticking up. Resize and add a drop shadow.
Move element 26 under the frame. Move and resize until it looks placed under the frame.
Place element 29 in front of the frame on the bottom. Resize and add a drop shadow.
Place element 3 along the lower part of the frame. Resize so there is room for a copy on the right side. Add a drop shadow.
Move element 5 over the joint in the lower left hand corner of the frame. Resize and add a drop shadow. Duplicate and move to the opposite side.
Place element 4 behind the bows layer. Rotate and resize so only a little of the ribbons' ends hangs off the sides. Add a drop shadow.
Now place element 2 behind the bows layer too. Resize and rotate so it goes along the length of the frame and up the sides.
Move the tube, full size, on top of everything. Resize the tube so her head and feet are hanging over the top and bottom of the frame. Add a drop shadow.
For the background I used the colors from pp12 to make a gradient. Erase parts of the paper between the frames and outside the frame.
Take another copy of the tube and leave her full size. Move her head and a little of her upper body behind the frame. Erase parts hanging outside the frame. Change the tube to luminosity and fill to 85%.
For the mask:
Open a new canvas, size 600x600.
Open P1 and resize to 600x600.
Open the mask and make sure it's 600x600.
Place the paper on to the canvas and then the mask on top.
Remove the white background and move behind the frame.
Resize the mask so it is outside the frame evenly on all sides.
Make sure it does not hang outside the canvas.
The name:
The font is Rochester.
The main color is #6e2b62.
The stroke, size 3, in color #471c44.
Add a drop shadow and bevel in these settings:
Gloss Contour: Cone-Inverted
Shadow: white
Add your copyright information and tagger mark.
Crop off any extras.
Save as .psd & .png.
We're done!
Here are few freebie snags for you :)


Thanks for coming by!
