
I have a new PTU Tutorial with Roman Zaric's new tube "Wishy" and the matching kit by Rissa's Designs.
**This tutorial was written by me and any resemblance is purely coincidental. It is written for those with a working knowledge of Photoshop.**
What you will need:
Font
Mask
WSL_Mark84
Scrap Kit
Wishy by Rissa's Designs
Tube
Wishy by Roman Zaric
Elements
Bottle
Bow
Brass Knuckle
CityScene
Dice
Frame3
Handcuffs
Lips2
Martini
Speakers
Papers
2
3
Let's start!
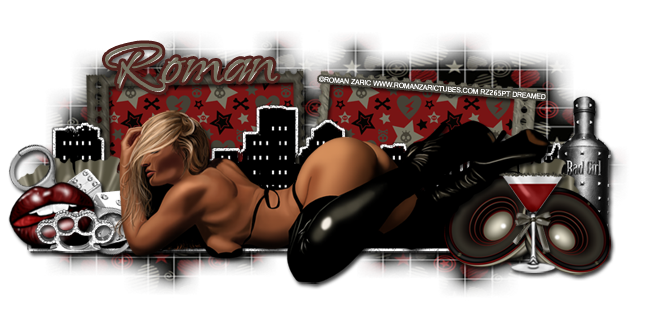
Open a larger canvas, 800x800.
Move the tube on to the canvas and resize. Leave enough room on both ends for elements and mask. Add a drop shadow.
Move the CityScene behind the tube and add a drop shadow.
Move Frame3 behind the CityScene and rotate so the flat part with the string is on the bottom. Erase any parts of the frame sticking out below the CityScene. Resize and add a drop shadow.
Move Paper3 behind the frame opening on the left. Resize rather small and erase any parts outside the frame. Duplicate this paper and move to the other opening. Erase extras and add a drop shadow.
Behind the tube on the right add the Speakers, Bottle, Bow, and Martini.
Resize the speakers so a little is hidden behind the tube and it meets the end of the CityScene. Add a drop shadow.
Resize the speakers so a little is hidden behind the tube and it meets the end of the CityScene. Add a drop shadow.
Move the Bottle behind the Speakers on the right side. Resize and add a drop shadow.
Place the Martini in front of the Speakers and the tube. Resize and add a drop shadow.
Move the Bow behind everything and on top of the CityScene. Flip it horizontally and resize. Add a drop shadow.
On the left side of the tube add the Handcuffs, Dice, Lips2, BrassKnuckles, and Bow.
Move the Lips2 to the edge of the CityScene and rotate so the left hand corner of the lips meets the lower left hand corner of the CityScene. Add a drop shadow.
Place the BrassKnuckles in front of the lips. Resize and add a drop shadow.
Move the Handcuffs behind the lips and the tube. Resize and add a drop shadow.
Move the Dice behind the handcuffs and the tube. Resize and add a drop shadow.
Move the Bow behind everything and on top of the CityScene. Flip it vertically and resize. Add a drop shadow.
Let's make the mask:
Open a new canvas, size 600x600.
Open a new canvas, size 600x600.
Open Paper2 and resize to 600x600.
Open the mask and make sure it's 600x600.
Place the paper on the blank canvas and then the mask on top.
Remove the white background and move it behind the frame on the right. Resize the mask so it just covers the right opening of the frame and has a little coverage in between the frames. Make sure no edges of the mask hang off the canvas.
Duplicate the mask and flip horizontally. Move the duplicate behind the frame opening on the left.
Link the masks together so you can resize and move them as one. Make sure the mask sticks out evenly on all four sides and nothing hangs off the edge of the canvas.
For the name:
Font is Echinos Park Script.
The main color is #767463.
The stroke, size 3, is color #51211d.
Add a drop shadow.
Add a bevel, change the shadow color to white and change the Gloss Contour to Cone-Inverted.
Add your copyright information and tagger mark.
Crop off any extras.
Save as .psd & .png.
Thanks for coming by!
