
I have a new PTU tutorial with a beautiful new tube by Ismael Rac called 2013 Angel!
I also used the matching kit by Kizzed by Kelz!

**This tutorial was written by me and any resemblance is purely coincidental. It is written for those with a working knowledge of Photoshop.**
Supplies
Filters
Xero Porcelain
Xero Radiance
Font
Mask
Scrap Kit
Template
Template 161
Tube
*Coming Soon!*
*You must obtain a license to use this tube.*
Elements
clouds 2
clouds
gate
harp
ribbon
sparkle stars
sparkle
Papers
1
2
3
5
15
Let's start!
Open a new canvas, size 650x650.
Link the template layers together. Remove the cr layer as well as layers 5, 7, & 8.
Move the rest of the template on to the canvas. Resize if necessary.
With each layer, select the pixels of the shape and expand by 3. Fill with #d9d9d9 and then add noise at 12%. Add a drop shadow to the glitter layer.
Place the tube on the right side of the template. Flip the tube horizontally, resize, add a drop shadow, and a white glow.
Take another copy of the tube and move it over layer 6 and create a clipping mask. Flip her as well so she is facing the same way as the main tube. Change the close up to luminosity.
Select the pixels of layer 6 and fill with #c6bbbf.
Filters
Add Xero Radiance to the main tube first:
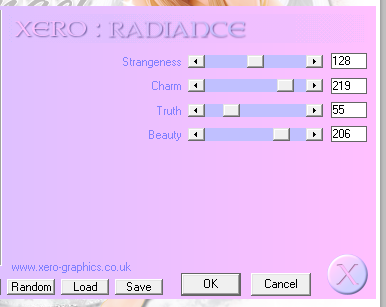
Then add Xero Porcelain:
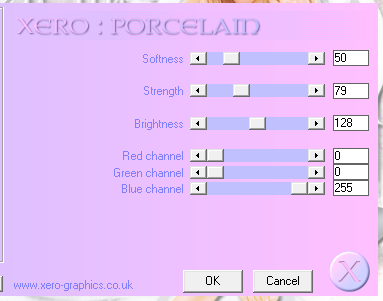
*Also add Xero Porcelain to the close up of the tube.*
On layer 4 place Paper2 and create a clipping mask. Arrange it so the bottom of the paper is showing a little, but you can still see the horizontal sparkle streak.
With layer 3, place Paper1 and create a clipping mask. Have the bottom of the paper mostly showing.
On layer 1, place Paper3, flip horizontally, and create a clipping mask.
Place clouds 2 behind the tube's head and resize.
Take the clouds element and place it on top and to the left of the clouds 2.
Behind the small circle in front, place the clouds 2 and resize.
Place the clouds element behind the tube and toward her bottom. Flip horizontally and resize.
In front of the clouds you just placed, place the clouds 2. Flip horizontally and resize.
Between the two clouds that sit behind the tube, place the banner and resize.
Add a drop shadow and a white glow.
Now place the harp between the small circle and the tube. Arrange the layers so the harp is sitting behind at least one layer of clouds that sit behind the tube. Add the same drop shadow and glow from the banner.
Move the gate behind the tube, harp, and the small circle and resize. Add the same drop shadow and glow.
Now take a copy of the sparkle stars and move it on to the canvas. Arrange them so it's on top of the gate but behind the tube. Rotate the sparkle stars so you see some of the larger stars around the outer edges of the clouds around the left side of the template.
Take another copy of the sparkle stars and flip horizontally. Move it just above the other layer of sparkle stars. This time move it around so you see the larger stars above and behind the tube.
One last copy of the sparkle stars needs to be placed higher than the other two. Move it directly behind the tube. Arrange the stars so it mostly rests on top of the gate and has some stars in the clouds on the bottom.
Move the sparkle on top of the tube. Resize and rotate so it lays vertically along the tube on the left side. Erase parts that are placed over her face and other weird areas. Take another copy of the sparkle and place it vertically along the tube on the right. Fill the spaces left by the first copy and erase stray sparkles.
Mask
Open new canvas, size 650x650.
Open paper5 and resize to 650x650 then move on to the canvas.
Open mask and resize to 650x650 then move on top of the paper.
Remove the white background and place behind the template.
Resize the mask so you can see it evenly around the template.
Make sure not to stretch it off the canvas.
Name
Font is Allura.
Main color is #c6c5c5.
Add a white stroke, size 1.
Add a drop shadow in #353535.
Add a glow in white.
Change the spread to 26 and the size to 10.
Add your tagger mark and copyright information.
Crop off extra canvas, but not parts of the tag.
Save as a .psd & .png.
Now a few snags for you!


Thanks for coming by and remember to leave some love!
