
PTU tutorial with Rock Diva by Roman Zaric!
With the matching kit by Kandii Popz.

**This tutorial was written by me and any resemblance is purely coincidental. It is written for those with a working knowledge of Photoshop.**
Supplies
Font
from dafont.
Mask
from Creative Misfits.
Scrap Kit
by Kandii Popz
Tube
*You must obtain a license to use this tube.*
Elements
DollarSign
Flower1
Flower3
Frame1
Glasses
GlitterCircle
Keys
Lips
Mic
Music
Record
Speaker
Wire
Papers
8
12
Let's begin :)
Open a new canvas, size 650x650.
Move Frame1 on to the canvas. Resize & add a drop shadow.
Place Paper12 behind the frame. Resize and erase the paper outside the frame.
Move the tube in front of the frame. Resize & add a drop shadow. It's ok if some of her hangs below the frame.
Place the GlitterCircle behind the frame. Resize so it circles the frame. Add a drop shadow.
In front of the tube, place the Keys. Resize & add a drop shadow.
Now change the eraser to Soft Round and erase the tube that is behind the keys.
Take the Speaker and move it to the left side of the keys and behind it. Flip horizontally, resize, & add a drop shadow.
Duplicate the Speaker and flip horizontally. Move to the opposite side and make it a little smaller than the first.
In front of the keys on the left side, place the DollarSign. Resize & add a drop shadow.
Behind the DollarSign, place the Mic. Flip it horizontally and rotate up. Resize & add a drop shadow.
On the right side, move the Glasses in front of the Keys. Resize & add a drop shadow.
Behind the Glasses, place the Record. Resize & add a drop shadow.
Behind everything but in front of the Keys and Speakers, move the Music. Resize a little & add a drop shadow in #6c0017.
Place the Lips on top of the Speaker on the right. Resize & add a drop shadow.
Move Flower1 in front of the tube, but behind the speakers. Resize & add a drop shadow.
Move Flower3 on the opposite side. Make it smaller than Flower1 and add a drop shadow.
Now use the Wire to place it around the lower half of the tag. Move it behind the frame and GlitterCircle. I used two copies and flipped each layer horizontally and moved it around on one side until it filled empty spaces. Erase parts that are too high or too far away from the frame. Resize & add a drop shadow.
Name
Font is Mixtape Mike Font.
Add a drop shadow.
Bevel:
Use the settings below.

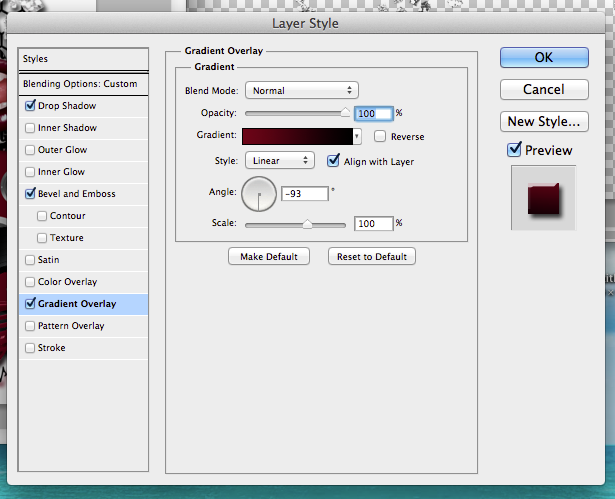
For the Gradient Overlay use black and #6c0017.
Use the settings below:
Mask
Open a new canvas, size 600x600.
Open P8 and resize to 600x600. Place on top of the canvas.
Open Circle Mask 2 by Sue and resize to 600x600 then move on top of the paper.
Remove the white background and place the mask behind the tag.
Add your tagger mark and copyright information.
Crop off any extra canvas.
Save as a .psd & .png.
Here are three free snags for you!


Thank you for coming by!
