
*Coming Soon!* Margarita by Arthur Crowe PTU tutorial!
I used the matching kit by Desirena Designs.
**This tutorial was written by me and any resemblance is purely coincidental. It is written for those with a working knowledge of Photoshop.**
Supplies
Font
Mask
Scrap Kit
by Desirena Designs
Template
Template 266
Tube
*You must obtain a license to use this tube.*
Elements
3
6
14
15
22
24
29
Papers
1
3
Let's begin :)
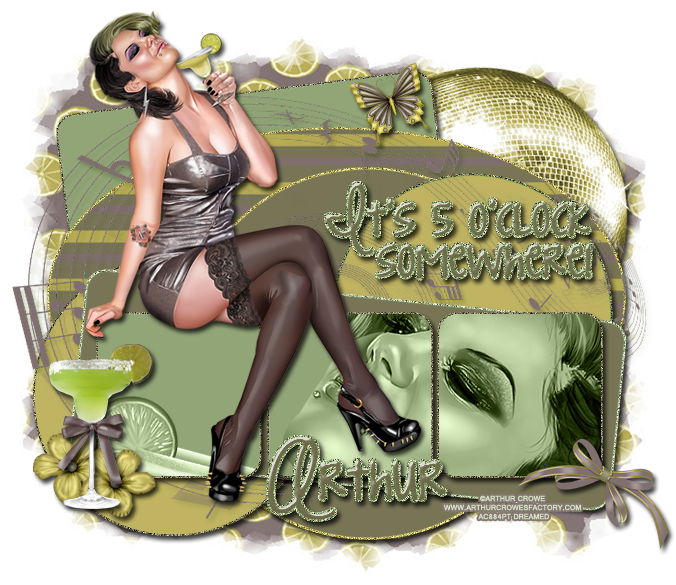
Open a new canvas, size 650x650.
Link the layers of the template together and move on to the canvas. Resize so there is plenty of empty space around it. Delete the credits and the word art.
On layer 1 of the template, the blue square, select pixels and fill with #92a577.
Select the pixels of the same square and expand by two pixels.
Add a new layer below the square and fill with #787556. Add noise at 20% and a drop shadow.
On layer 2 of the template, the orange oval, move P3 and create a clipping mask.
Select the pixels of the oval and expand by 2. Add a new layer below it and fill it with #c0b462. Add noise at 20% and add a drop shadow.
On layer 4 of the template, the green circle, and fill it with #c0b462.
Select the pixels of the circle and expand by 2. Fill the layer below it with #787556. Add noise at 20% and add a drop shadow. Repeat the same steps for layer 5.
On layer 4 of the template, select pixels and fill with #787556. Select the pixels of the circle and expand by 2. Add a new layer below it and fill it with #c0b462. Add noise at 20% and add a drop shadow.
On layer 6 of the template, select the pixels and fill with #787556.
Select the pixels and expand by 2. Fill the layer below it with #92a577.
Add noise at 20% and add a drop shadow.
On layer 7 of the template, select the pixels and fill with #92a577.
Select the pixels and expand by 2. Fill the layer below it with #787556.
Add noise at 20% and add a drop shadow.
Now place the full size tube. I flipped her horizontally and placed her on layer 7 so she rested on it. Resize and add a drop shadow.
Take the close up version of the tube and place it over layer 7 and create a clipping mask.
Have her spread over the three squares. Resize so you just see a little of her drink and most of her face. Change it to luminosity.
Place element 24 and move it between layer 2 and layer 4. Resize a little and move so it touches almost every layer. Add a drop shadow in #b3c29d.
Move element 3 in front the template in the left hand corner. Resize and add a drop shadow.
Behind the margarita, place element 14. Resize and add a drop shadow. Duplicate the flower and move it next to the other one and behind the drink.
Place element 29 on top of the margarita and resize so it's a small bow on the drink. Add a drop shadow.
Place element 15 on top of the template on the right side so it lays on layers 6 & 7. Resize and add a drop shadow.
Move element 6 on top of layer 1 at the top right of the square. Have it lay over layer 2. Resize and add a drop shadow.
Move element 22 behind the template on the right. Resize and add a drop shadow.
Name & Word Art
Font is KG Strawberry Limeade.
Main color is #787556.
Select pixels and expand by 2. Fill with #92a577.
Add 20% to the stroke layer and a drop shadow.
Mask
Open a new canvas, size 600x600.
Open P1 and resize to 600x600. Place on top of the canvas.
Open WSL_Mask363 and move on top of the paper.
Remove the white background and place the mask behind the tag. Flip horizontally and make it evenly stretched on all sides.
Add your tagger mark and copyright information.
Crop off any extra canvas.
Save as a .psd & .png.
Here are three snags for you :)

Leave some love!
Thanks for stopping by!
