
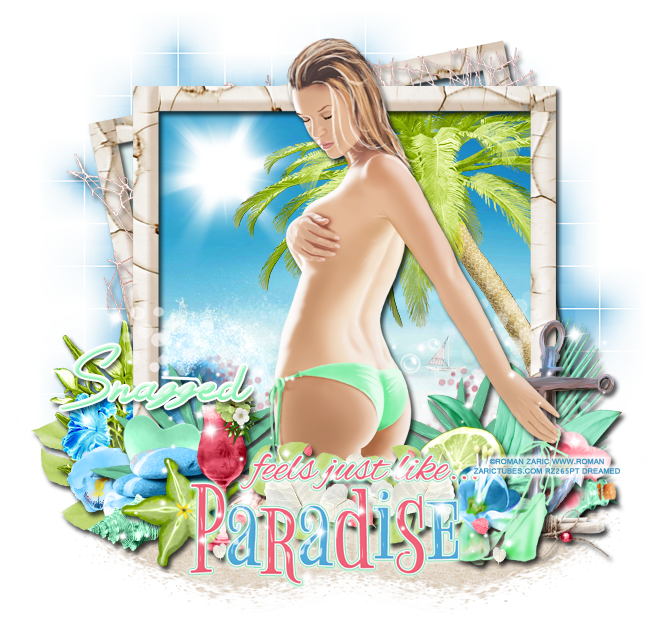
I have a new PTU tutorial using a gorgeous tube by Roman Zaric called Dijana.
I matched her with Tasha's Playground kit "Feels Like Paradise".
Don't forget to check out the free snags below!

Supplies
Font
Silent Reaction
Mask
WSL_Mask84
Scrap Kit
Feels Like Paradise by Tasha's Playground
Tube
Dijana by Roman Zaric
Elements
anchor
boat
bottle2
bubbles2
drink1
flower1
flower2
flower3
flower5
flower7
frame3
heart
leaf
leaf2
leaves
lime2
net2
palm frond
palm tree
sand2
scroll
shell1
shell2
sparkle2
starfruit
stones
sun glare
swirl2
waves
wordart
Papers
I matched her with Tasha's Playground kit "Feels Like Paradise".
Don't forget to check out the free snags below!
**This tutorial was written by me and any resemblance is purely coincidental. It is written for those with a working knowledge of Photoshop.**
Supplies
Font
Silent Reaction
Mask
WSL_Mask84
Scrap Kit
Feels Like Paradise by Tasha's Playground
Tube
Dijana by Roman Zaric
Elements
anchor
boat
bottle2
bubbles2
drink1
flower1
flower2
flower3
flower5
flower7
frame3
heart
leaf
leaf2
leaves
lime2
net2
palm frond
palm tree
sand2
scroll
shell1
shell2
sparkle2
starfruit
stones
sun glare
swirl2
waves
wordart
Papers
1
3
7
Let's begin!
Open a new canvas, size 700x700.
Move frame3 on to the canvas. Resize and add a drop shadow.
Place the tube on top of the frame. Resize and add a drop shadow. Erase parts of her leg that hang over the frame.
Move paper1 behind the frame. Have most of the sky showing, but show some of the waves too. Erase extras.
Duplicate the frame and move it behind the main frame. Rotate it to the left a little.
Place paper3 behind the frame in the back. Erase extras.
Place the net2 between the two frames. Resize so it doesn't hang off too much on either side and add a light drop shadow.
Place the sun glare in the upper right hand corner and flip horizontally. Erase any of it outside the frame.
Move the palm tree on the paper and above the sun glare. Resize and add a drop shadow. Erase extras outside the frame.
Now place the boat on the paper too. Resize so it's super tiny and appears off in the distance. Place it to the right of the tube. No drop shadow.
In front of the boat and to the right of the tube, place bubbles2. Erase the large bubble and resize so they're not too large.
Move the waves in the left hand corner behind the frame. Resize and erase extras.
On top of the frame, place swirl 2. Rotate so both ends or on both sides of the tube.
Now move the sand2 underneath and in front of the frames on the right. Resize and duplicate. Flip the copy horizontally and move to the left side. Move the copy underneath the original.
On the left side of the frames and behind the front frame, place the leaf. Resize and add a drop shadow.
On top of the leaf, place flower7. Resize and add a drop shadow.
In front of flower7, place flower5. Flip it horizontally, resize, and add a drop shadow.
Move the stones in front of the left corner of the frame and flip horizontally. Resize and add a drop shadow.
Behind the stones, place the heart. Rotate to the right and then resize and add a drop shadow.
In front of the stones, place shell2. Resize and add a drop shadow.
Move the starfruit in front of the shell2 and stones. Resize and add a drop shadow.
Behind the heart and stones, place leaf2. Rotate so it is vertical. Resize and add a drop shadow.
In front of the leaf2 and behind the starfruit, place shell1. Resize and add a drop shadow.
In front of the starfruit place drink1 and flip horizontally. Resize and add a drop shadow.
On the right side of the frames, place the palm frond. Rotate so it is vertical and hide about half of it behind the frame. Resize and add a drop shadow.
Move flower3 on top of the palm frond and frames. Resize and add a drop shadow.
Duplicate leaf2 from before and move it to the right side behind flower3.
Take flower2 and move it on top of flower3. Rotate so the top of it points to the right. Resize and add a drop shadow.
Place bottle2 on top of the flower2. Flip it horizontally and then vertically. Resize and add a drop shadow.
Now place the anchor on top of the bottle so it is as tall as the palm frond. Resize and add a drop shadow.
Place the scroll in front of the anchor. Resize and add a drop shadow.
To the left and in front of the anchor, place the lime. Resize and add a drop shadow.
In front of the anchor and lime, place flower1 and flip it vertically. Resize and add a drop shadow.
Make sure the tube is on top of the elements on the right.
In the middle, in front of the tube, place the leaf. Resize and add a drop shadow.
Duplicate the leaf and flip horizontally. Have them overlap a little.
On top of the two leaves, place the leaves, Resize so they are similar to the size of the leaf. Add a drop shadow. Duplicate and flip horizontally then move to the other side. Have these overlap as well.
On top of everything, place the wordart in the middle.
Add an Outer Glow in color #9bf0b9.
Change the Spread to 18 and the size to 6.
Add a stroke, size 1, in color #8de0bf.
Now move sparkle2 on top of everything on top of the sand. Resize so one layer just covers the right side. Rotate up a little. Duplicate the flip horizontally. Rotate so it's covers things on the left side.
Mask:
Open a new canvas size 600x600.
Open paper7 resized to 600x600.
Open the mask.
Place the paper and then the mask on top of the canvas.
Remove the white background.
Place behind everything. Resize, but do not stretch it off the canvas.
Name:
Font is Silent Reaction.
Color is #92f1b7.
Stroke is size 2 in white.
Add a drop shadow.
Add your copyright information and tagger mark.
Crop off any blank parts of the canvas. Be careful not to cut off any parts of the tag.
Save as a .psd & .png.
I also have a few free snags for you!


Leave some love when you snag :)
Thanks for coming by!

3
7
Let's begin!
Open a new canvas, size 700x700.
Move frame3 on to the canvas. Resize and add a drop shadow.
Place the tube on top of the frame. Resize and add a drop shadow. Erase parts of her leg that hang over the frame.
Move paper1 behind the frame. Have most of the sky showing, but show some of the waves too. Erase extras.
Duplicate the frame and move it behind the main frame. Rotate it to the left a little.
Place paper3 behind the frame in the back. Erase extras.
Place the net2 between the two frames. Resize so it doesn't hang off too much on either side and add a light drop shadow.
Place the sun glare in the upper right hand corner and flip horizontally. Erase any of it outside the frame.
Move the palm tree on the paper and above the sun glare. Resize and add a drop shadow. Erase extras outside the frame.
Now place the boat on the paper too. Resize so it's super tiny and appears off in the distance. Place it to the right of the tube. No drop shadow.
In front of the boat and to the right of the tube, place bubbles2. Erase the large bubble and resize so they're not too large.
Move the waves in the left hand corner behind the frame. Resize and erase extras.
On top of the frame, place swirl 2. Rotate so both ends or on both sides of the tube.
Now move the sand2 underneath and in front of the frames on the right. Resize and duplicate. Flip the copy horizontally and move to the left side. Move the copy underneath the original.
On the left side of the frames and behind the front frame, place the leaf. Resize and add a drop shadow.
On top of the leaf, place flower7. Resize and add a drop shadow.
In front of flower7, place flower5. Flip it horizontally, resize, and add a drop shadow.
Move the stones in front of the left corner of the frame and flip horizontally. Resize and add a drop shadow.
Behind the stones, place the heart. Rotate to the right and then resize and add a drop shadow.
In front of the stones, place shell2. Resize and add a drop shadow.
Move the starfruit in front of the shell2 and stones. Resize and add a drop shadow.
Behind the heart and stones, place leaf2. Rotate so it is vertical. Resize and add a drop shadow.
In front of the leaf2 and behind the starfruit, place shell1. Resize and add a drop shadow.
In front of the starfruit place drink1 and flip horizontally. Resize and add a drop shadow.
On the right side of the frames, place the palm frond. Rotate so it is vertical and hide about half of it behind the frame. Resize and add a drop shadow.
Move flower3 on top of the palm frond and frames. Resize and add a drop shadow.
Duplicate leaf2 from before and move it to the right side behind flower3.
Take flower2 and move it on top of flower3. Rotate so the top of it points to the right. Resize and add a drop shadow.
Place bottle2 on top of the flower2. Flip it horizontally and then vertically. Resize and add a drop shadow.
Now place the anchor on top of the bottle so it is as tall as the palm frond. Resize and add a drop shadow.
Place the scroll in front of the anchor. Resize and add a drop shadow.
To the left and in front of the anchor, place the lime. Resize and add a drop shadow.
In front of the anchor and lime, place flower1 and flip it vertically. Resize and add a drop shadow.
Make sure the tube is on top of the elements on the right.
In the middle, in front of the tube, place the leaf. Resize and add a drop shadow.
Duplicate the leaf and flip horizontally. Have them overlap a little.
On top of the two leaves, place the leaves, Resize so they are similar to the size of the leaf. Add a drop shadow. Duplicate and flip horizontally then move to the other side. Have these overlap as well.
On top of everything, place the wordart in the middle.
Add an Outer Glow in color #9bf0b9.
Change the Spread to 18 and the size to 6.
Add a stroke, size 1, in color #8de0bf.
Now move sparkle2 on top of everything on top of the sand. Resize so one layer just covers the right side. Rotate up a little. Duplicate the flip horizontally. Rotate so it's covers things on the left side.
Mask:
Open a new canvas size 600x600.
Open paper7 resized to 600x600.
Open the mask.
Place the paper and then the mask on top of the canvas.
Remove the white background.
Place behind everything. Resize, but do not stretch it off the canvas.
Name:
Font is Silent Reaction.
Color is #92f1b7.
Stroke is size 2 in white.
Add a drop shadow.
Add your copyright information and tagger mark.
Crop off any blank parts of the canvas. Be careful not to cut off any parts of the tag.
Save as a .psd & .png.
I also have a few free snags for you!
Thanks for coming by!