
FTU tutorial using Tomboy Princess by Irish Princess Designs!
Visit Scrap Candy to find out where to download it :)
*Irish Princess Designs is the featured designer at Scrap Candy for the month of July so check out her kits while they are 50% off!*
**This tutorial was written by me and any resemblance is purely coincidental. It is written for those with a working knowledge of Photoshop.**
Supplies
Font
Mask
Scrap Kit
Tomboy Princess
by Irish Princess Designs
You can download it at Scrap Candy!
Template
Sassy, Classy, Smart Assy template
Tube
*You must obtain a license to use this tube.*
Elements
Bottle
Drink
GlitterTrail
Helmet
Jersey
Ribbon
Rose
Sparkles
Swirls
Tiara
WordArt
Papers
1
2
3
4
6
9
Let's begin!
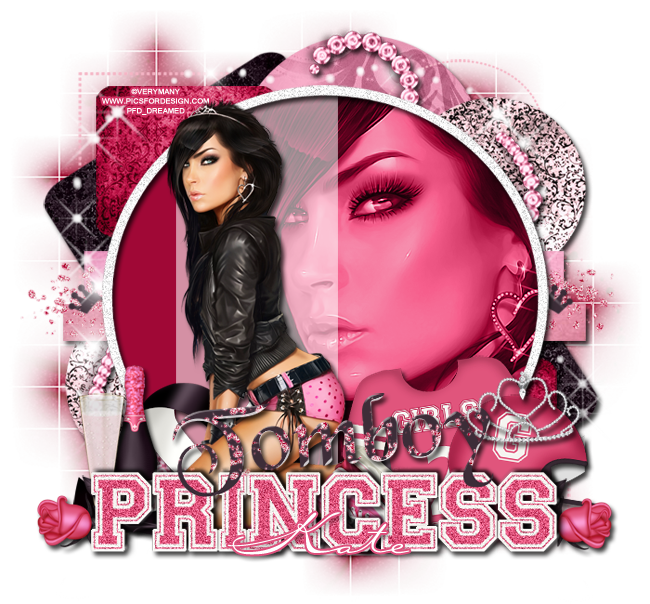
Open a new canvas, size 650x650.
Link the template together, leaving out the word art, and move on to the canvas. Resize so there's plenty of white space around the template.
On layer 11, select the pixels of the big circle and fill with #a00836.
On layer 13, the frame of the big circle, add noise at 12%. Add a drop shadow.
Drop the opacity of layer 12 down to 55%.
Move the close up of the tube over the large circle and create a clipping mask.
Change it to luminosity and opacity to 90%.
Take the full size tube and move her in front of the template. Resize and add a drop shadow. Enhance her brightness a little.
Move Paper2 over layer 1 and create a clipping mask. Resize the paper a little and add a drop shadow to layer 1.
Duplicate the paper and move it over layer 2 and create a clipping mask. Add a drop shadow to layer 2.
Place Paper6 over layer 3 and create a clipping mask. Resize the paper and move it around until you see the design on the paper.
Duplicate the paper and move it over layer 4. Move the paper around so you see different parts of the design. Add a drop shadow to both layers 3 & 4.
For the Dotted layers 1 - 4, change the color overlay to #f5b5c5.
Move Paper3 over layer 5 and create a clipping mask. Resize a little then add a drop shadow to layer 5.
Duplicate the paper and move it over layer 6 and create a clipping mask. Add a drop shadow to layer 6.
With layers 7 & 8, move paper 1 over each layer and create a clipping mask. Add a drop shadow to both layers.
Behind the large circle and frame, place the GlitterTrail on top of layers 7 & 8. Move one copy to the left of the circle and then duplicate it and move it to the other side.
Move Paper4 over layer 9 and create a clipping mask. Add a drop shadow to the layer.
Duplicate the paper and move it over layer 10 and create a clipping mask. Add a drop shadow to the layer.
Now place the Sparkles around the large circle. I took about four copies of the Sparkles and moved each one around the template. Flip each layer in different ways to get different coverage. Erase any parts that hang off the template too much.
Behind the Sparkles, place the Swirls. Rotate so the bottom of the Swirls is hiding behind the WordArt and the top curves along the circles in the top right. Add a drop shadow.
Place the WordArt in front of the tube. Add a drop shadow and a bevel. Change the Gloss-Contour to Cone-Inverted and the shadow to white.
Take another copy of the GlitterTrail and place it over the word 'Tomboy'. Create a clipping mask and erase any parts that hang over to 'Princess'. You only want the glitter trail in 'Tomboy'.
Behind the full size tube, place the Ribbon. Resize & add a drop shadow.
Directly behind the word art, place the Helmet on the right side of it. Resize & add a drop shadow.
Behind the Helmet, move the Jersey. Resize & add a drop shadow.
On top of the Helmet, place the Tiara. Resize & add a drop shadow. Erase parts so it looks like it is resting on the Helmet.
On the left side of the tube and word art, place the Bottle. Resize & add a drop shadow.
In front of the bottle, place the Drink. Resize & add a drop shadow.
Move the Rose behind the word art on the left end. Erase the petals below the rose. Resize & add a drop shadow.
Duplicate the rose and flip horizontally. Move to the other end of the word art.
Name
Font is Carlotta.
Main color is white.
Add a stroke, size 2, in color #de507c.
Add a drop shadow.
Mask
Open a new canvas, size 600x600.
Open Paper9 and resize to 600x600. Place on top of the canvas.
Open WSL_Mask84 and move on top of the paper.
Remove the white background and place the mask behind the tag. Make it evenly stretched on all sides.
Add your tagger mark and copyright information.
Crop off any extra canvas.
Save as a .psd & .png.
Thank you for coming by!
