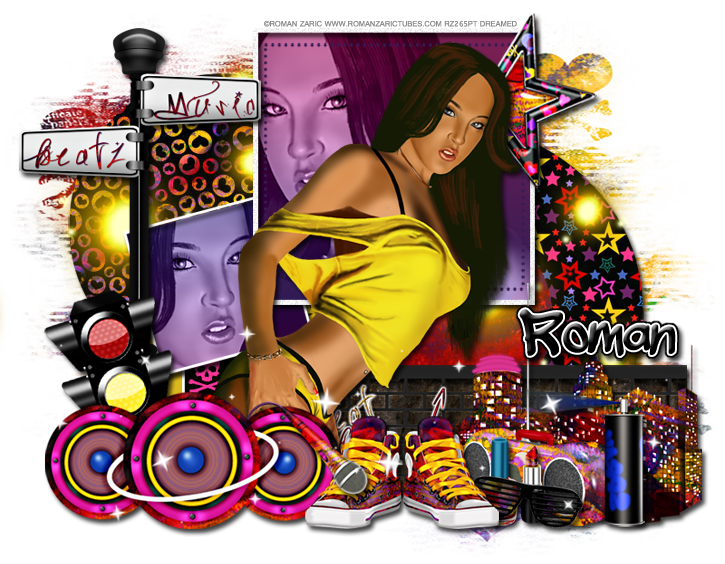
New PTU Tutorial using Gina by Roman Zaric!
It is matched with Beatz Street by Inzpired Creationz.
**This tutorial was written by my any resemblance is purely coincidental It is written for those with a working knowledge of Photoshop.**
Supplies
Font
Mask
Scrap Kit
Beatz Street by Inzpired Creationz
Template
Template 79 by Kandi Kissez
Tube
Gina by Roman Zaric
Elements
Boombox
Charm
CityScene
Glasses
Glow Lights 2
Lipstick and Nailpolish
Mic
Sneeks
Sparkles2
Speakers 1
Spray Can 2
Stoplight
Street Sign
Wall
Papers
1
8
13
15
Let's begin!
Open a new canvas, size 650x650.
Open the template. Link the layers together then unlink all the word art and the bracket layers. We won't be using those.
Resize the template if necessary.
Take the tube's full body and move her so she sits on top of the small black frame 2. Add a drop shadow to her.
Take the close up of the tube and place her in the large frame back by creating a clipping mask. Flip her horizontally and resize so she's peeking over the main tube.
I made a gradient paper with these two colors:
Left: #371b54
Right: #741f53
Move it to the large black frame and move it below the tube and create a clipping mask. Move the gradient paper around until the darker purple is at the bottom and the other color is at the top.
Change the color of the dotted square by using the color overlay in blending options. Use the color #371b54.
For the small black frame 1, add the same gradient paper and add the close up tube as well. Resize her and add a drop shadow to the frame.
Take paper 8 and place it over the pink circle. Create a clipping mask. You may resize it. Add a drop shadow to the pink circle layer.
Move paper 13 over the black circle and create a clipping mask. Add a drop shadow to the black circle.
Move paper 1 over the small pink circle and create a clipping mask. I moved it around until only the red part was showing.
For the rounded tab, add a drop shadow and change the color overlay to this color #dbb91e.
The small black frame 2 is hidden by the tube and elements mostly so just use paper 15 and move it over the frame then create a clipping mask. Add a drop shadow to the frame.
Take the Charm and place it over the large star by the tube's head. Move it behind the tube, but on top of the star. Resize the charm so it's a similar size the star then erase any little parts showing. The other star will be covered so you can erase it. Add a drop shadow to the charm.
On the left side of the tube and on top of the smaller frame, place the Street Sign. Resize so it's about as tall as the tube and doesn't cover the smaller frame of the tube close up. Add a drop shadow.
In front of the street sign place the Stoplight, Resize and rotate a little to the left then add a drop shadow.
Behind the tube on the right, place the Wall. Resize so it's hidden the tube on the left a little and just hangs off the template. Add a drop shadow.
In front of the wall, place the City Scene and flip it horizontally. Resize so the tallest point is a little taller than the wall. Have the City Scene stick out over the wall a little on the right side. Add a drop shadow.
In front of the Stoplight on the left place the Speakers 1. Resize and add a drop shadow.
Place the Sneeks in front of the Speakers so they just overlap a little. Resize and add a drop shadow.
Move the Mic in front of the Speakers and the Sneeks. Erase part of the Mic cord so it looks like it comes from behind the Speakers. Add a drop shadow.
Now in front of the city scene and behind the Sneeks place the Boom Box. Resize and flip horizontally then add a drop shadow.
Between the Sneeks and the Boom Box, place the Lipstick and Nailpolish. Resize and flip horizontally then add a drop shadow.
Place the Glasses in front of the Lipstick and Nailpolish. Resize, rotate a little to the right, and add a drop shadow.
Place Spray Can 2 and place it in front of the Boom Box and City Scene. Place it in the middle of the two. Resize and add a drop shadow.
Move the Glow Lights 2 behind the large frame, but on top of the large pink circle on the left side. Resize and rotate so you just see a few. Erase any parts that show on the right side. Take another copy of the Glow Lights 2 and place it on the right side of the tube and behind the large frame. Resize and rotate then erase any parts that show on the left side.
Take Sparkles 2 and move them on top of everything below the tube. Erase any sparkles that hang off the template or on the tube.
Mask:Open a new canvas, size 650x650.
Open paper 1 and resize it to 650x650.
Open mask then move it on to the canvas and then the paper on top.
Remove the white background and place behind the template. Stretch the sides and top so it is visible, but does not hang off the edges.
Name:
The font is Wickhop Handwriting.
Main color is black with a white strike size two.
Select the pixels of the name and expand by four. Fill this layer with black and add a drop shadow.
Add your copyright information and tagger mark.
Crop off any extra parts of the canvas.
Save as a .psd and .png.
Thanks for coming by!


